
Marhaban! That's how you say hello or welcome in Egypt.
My post today is two greeting cards and a tag using the wonderful Muse On The Nile stamp plate and the Egypt collage sheet. I've also got an altered tag as a little bonus.

The first card I made has King Tut's face and the pyramids stamped on thin mica chips with StazOn ink. When you stamp on mica be sure to use a steady hand because rubber stamps may slide a little if you aren't careful. It's a little like stamping on plastic. Notice how dark the mica started out? It's a rock that is formed of paper thin layers. You can pull them apart to get the color you desire. The pieces were attached with a glue stick. Don't worry, you can't see the glue.
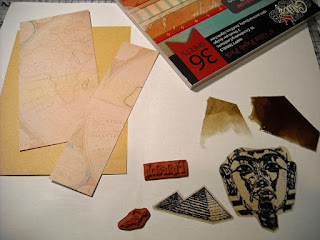

There is a globe pattern in the Happy Travels paper collection from Glitz. I trimmed it down so keep the side with Egypt and set aside the other piece for a project later on. The yellow background is from a Graphic 45 paper pad and has a very faint crackle pattern that isn't really visible here. I thought it went well with the ancient theme. Once the mica was glued in place I stamped the words from the stamp plate around the images. The words in black squares were cut from the Egypt collage sheet.

Do you like the shiny bling? I had a scrap of gold foil from another project. I set the metal sheet on a mouse pad and used the tip of my ScorPal stylus to create this random pattern. Then I cut a random shape from the piece and glued it in place with tacky glue. I paired it with a gold glitter layer so that the gold metal wouldn't be overpowering for the rest of the card if it was the only shiny element.

I thought this chevron paper made a great background for an Egyptian card! It hints at a pyramid, doesn't it? I bought a sheet of the Egyptian collage on parchment from Altered Pages so the Pharaoh had a vague yellow tint and a blue/black design and it paired beautifully with this Glitz design. The paper pad also had a solid dusky blue sheet and I stamped the pyramids on it to match the background. Foam dimension squares hold the pyramids a little off the card.

As an accent piece, I used the Egypt collage printed on ivory colored paper so that it would blend with the shipping tag.


List of supplies:
Muse on the Nile stamp plate
Mica Chips
Gold Foil
Glitz paper pads
Tacky Glue & Glue Stick
Double-Sided Adhesive
Foam Dimensional Adhesive
Scor Pal
StazOn Ink Pad
Egypt Collage Image Sheet
Yellow Tag Alphabet Collage Image Sheet
Shipping Tag

My post today is two greeting cards and a tag using the wonderful Muse On The Nile stamp plate and the Egypt collage sheet. I've also got an altered tag as a little bonus.

The first card I made has King Tut's face and the pyramids stamped on thin mica chips with StazOn ink. When you stamp on mica be sure to use a steady hand because rubber stamps may slide a little if you aren't careful. It's a little like stamping on plastic. Notice how dark the mica started out? It's a rock that is formed of paper thin layers. You can pull them apart to get the color you desire. The pieces were attached with a glue stick. Don't worry, you can't see the glue.


There is a globe pattern in the Happy Travels paper collection from Glitz. I trimmed it down so keep the side with Egypt and set aside the other piece for a project later on. The yellow background is from a Graphic 45 paper pad and has a very faint crackle pattern that isn't really visible here. I thought it went well with the ancient theme. Once the mica was glued in place I stamped the words from the stamp plate around the images. The words in black squares were cut from the Egypt collage sheet.

Do you like the shiny bling? I had a scrap of gold foil from another project. I set the metal sheet on a mouse pad and used the tip of my ScorPal stylus to create this random pattern. Then I cut a random shape from the piece and glued it in place with tacky glue. I paired it with a gold glitter layer so that the gold metal wouldn't be overpowering for the rest of the card if it was the only shiny element.

I thought this chevron paper made a great background for an Egyptian card! It hints at a pyramid, doesn't it? I bought a sheet of the Egyptian collage on parchment from Altered Pages so the Pharaoh had a vague yellow tint and a blue/black design and it paired beautifully with this Glitz design. The paper pad also had a solid dusky blue sheet and I stamped the pyramids on it to match the background. Foam dimension squares hold the pyramids a little off the card.

As an accent piece, I used the Egypt collage printed on ivory colored paper so that it would blend with the shipping tag.


Muse on the Nile stamp plate
Mica Chips
Gold Foil
Glitz paper pads
Tacky Glue & Glue Stick
Double-Sided Adhesive
Foam Dimensional Adhesive
Scor Pal
StazOn Ink Pad
Egypt Collage Image Sheet
Yellow Tag Alphabet Collage Image Sheet
Shipping Tag
the mica was genius! grand project!
ReplyDeletethese are so luxe and royal! I just adore them.
ReplyDeleteWould you like my shipping address? :P
I'd love to share them with you!
DeleteFabulous Cards Robin, great use of these wonderful stamps and I love your choice of background papers! xx
ReplyDelete