
I am honored to be the first to wish our blog followers a most Happy New Year!!!!!
I hope everyone had a very happy holiday and is ready for an inspired, art-filled New Year.
Today I have for you a little plan ahead project that will come in two parts. Today is part one and in two weeks I will present part two. For part 1 I have made a Valentines Day card. This can be used to invite your sweetie to the dinner where part two will come into play.

So, let's begin...
 First, I made a card out of this beautiful 12x12 card stock from Alteredpages.com. There are so many papers to choose from and the stock is always fresh...you can find just a few of them here. I sized the card appropriately to an envelope I had on hand and based the measurements on that. I added an extra piece of scalloped edge craft paper to the inside after adding a bit of color with my Staz-on in purple.

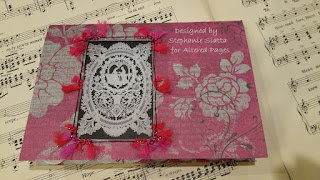
 Here you can see the cutout and in the next pic you can see that I have attached the vellum image inside the card and added a bit of trim ...you can find an assortment of great trims and ribbons in the link.


I hope everyone had a very happy holiday and is ready for an inspired, art-filled New Year.
Today I have for you a little plan ahead project that will come in two parts. Today is part one and in two weeks I will present part two. For part 1 I have made a Valentines Day card. This can be used to invite your sweetie to the dinner where part two will come into play.

So, let's begin...


Next, I planned out a window in my card for my romantic image that you can find here that I had, printed on vellum. I just drew a light pencil line in the approximate size of the image and then cut that out using my craft knife.


In this picture below you can see the inside of my card where I used that scalloped edge paper. I added a bit of dimensional adhesives and used a scrap of the back side of my 12x12, fussy cut that and added some interest with my Wink of Stella brush pen. If you have seen some of my previous posts, you know this is a go to tool of mine...a hint of glitter with no mess. I also used a cute little Love stamp from my stash to add a little extra something.

And, here you go...the final card. Again, this is part 1 to a two part Valentine's Day romantic DIY. I hope you come back and see part two, two weeks from today.

Take a look here for a little hint.
Part two will coordinate seamlessly with this amazing assemblage form that has so many uses. All papers, collage images and embellishments will work together...first with the invitation and part two with the table scape. Please check back for the final look.
Thanks for stopping by and again, Happy New Year!
Stephanie Siatta
Supplies -
Valentine and Lace collage - printed on velum
Misc. Embellishments - ribbons and trims
Beautiful Valentine's Day card, Steph. Love the colors and images you chose. It is so elegant looking.
ReplyDelete