I love dragons. I love the stories as well as the artwork that abounds around these winged wonders of old. When I first found the Altered Pages website and saw the wonderful collage images that were available, DRAGON was one of my first searches. I found this page and fell in love with this guy. I've used him on another project last year. He was featured on a gift box on that post.
This time, he is much, MUCH bigger!
But, I'm getting ahead of myself. First I had to make the canvas to hold him. For that, I chose an 8x10 canvas board and added layer after layer of Activa Rigid Wrap for texture. It was very easy to apply! And it's always fun to get in and work a project with your hands. I stamped in a fine diamond shape while the plaster was still wet in a couple of places. Because it was very wet from all of those layers, I set it off to the side to dry for about 24 hours.
Then I added a layer of gesso and after that, I began to add color. Art Anthology shamrock green is the base color. It goes on smooth and has a light sheen to it. When that was dry, I added pigment from my green, brown and gold Steampunk Gelatos. The entire canvas board was sealed with a spray to prevent the Gelatos from smearing or rubbing off. A touch of Irresistible spray was added for more texture.
 |
| Art Anthology green paint as the base color |
 |
| With highlights |
 |
| Dried - without color |
 |
| Dried - with color |
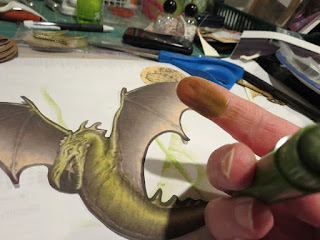
The dragon was resized in my print program to a full page size and printed on heavy card stock. I applied Gelato pigment to my fingertip and then rubbed it on the image to avoid streaks. I also chose a background that had a dragon image on it and cut them both out.
The images were glued down with gel medium and the coins, gears and tokens were attached with Tacky Glue.
I hope you like him as much as I do. Thanks for stopping by. Please come back again to see what other projects the Altered Pages Design Team has to share with and inspire you!
OUR DECEMBER GIVEAWAY
Comment to win!


I LOVE how this came out!! Thank you for sharing!
ReplyDeleteGreat layers of texture and color. The green is fantastic and the composition is wonderful.
ReplyDeleteThis is a fabulous piece! I love how you added rigid wrap to the canvas first. I must try this for myself.
ReplyDeleteFabulous project. The wings are phenomenal.
ReplyDelete