Hello everyone, and welcome back to my regularly scheduled post. As I am sure you know, we have the great pleasure of working with our monthly sponsor ...

Yes, Stencil 1 has some absolutely wonderful stencil designs and a wide variety, as well. I am sure you will find something to your liking.
My particular stencil came with three sets of butterflies. In my previous post, you can see the altered tag I made using one set. Today, I am going to play with yet another one of the images from the set and use it in my art journal. You may remember the little mini art journal I made and began sharing some of the pages with you. Click here to see that post.
 To prevent further paint seepage through the middle pages of the book, I added a strip of washi tape down the center.
 Next, apply a coat of white gesso over both pages as well as the center tag. Allow the gesso to dry. (no photo) Now apply some torn scraps of large sheet music, Kaisercraft print papers, and yellow floral trim. Overlap each piece, as shown.

 Spray distress stain sprays over the page, misting with water to make the inks spread, and then drying as you go to stop the color spreading. It is a cool process that Tim Holtz (I believe) came up with.
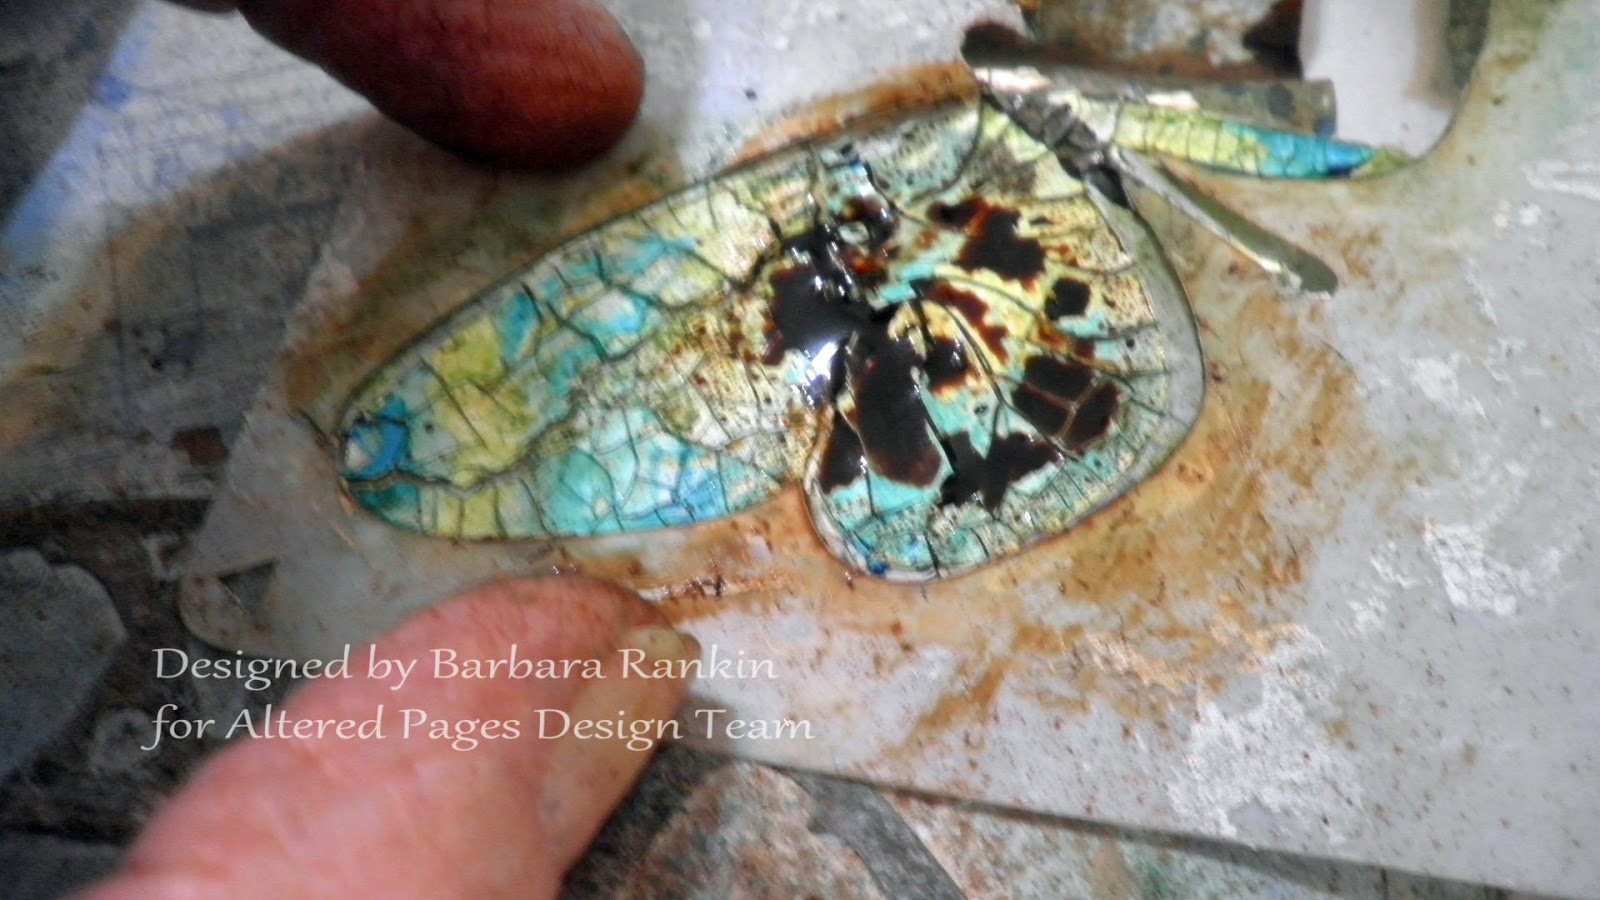
 When the pages are good and dry, place the solid butterfly stencil where you want it and spread crackle paste with a spatula. Allow the paste to dry on its own, as crackle pastes prefer to crackle at its own speed. (TIP: Place a few of the stenciled butterflies off the page).

 These are the three gelato colors I used on the crackled butterflies. I used both my Waterbrush and my fingers to spread the colors. If you are afraid you will go past the crackled image, then place your stencil back over it (as shown in the photo) and rub your colors until you like the result. I later added some Ochre Gelato to warm the colors a bit.

 Using a water brush helps spread the colors.
 Using my finger to add more blue and green gave more depth to the images. Then, I used a Faber-Castell black Big Brush pen through the stencil (for the body) and smudged the ink a bit to lessen the harshness of the black.

 The dark blue speckles you see are a result of turning the stencil over and pressing the stencil onto the page to add those bits of color. Never waste an opportunity to use up leftover inks.


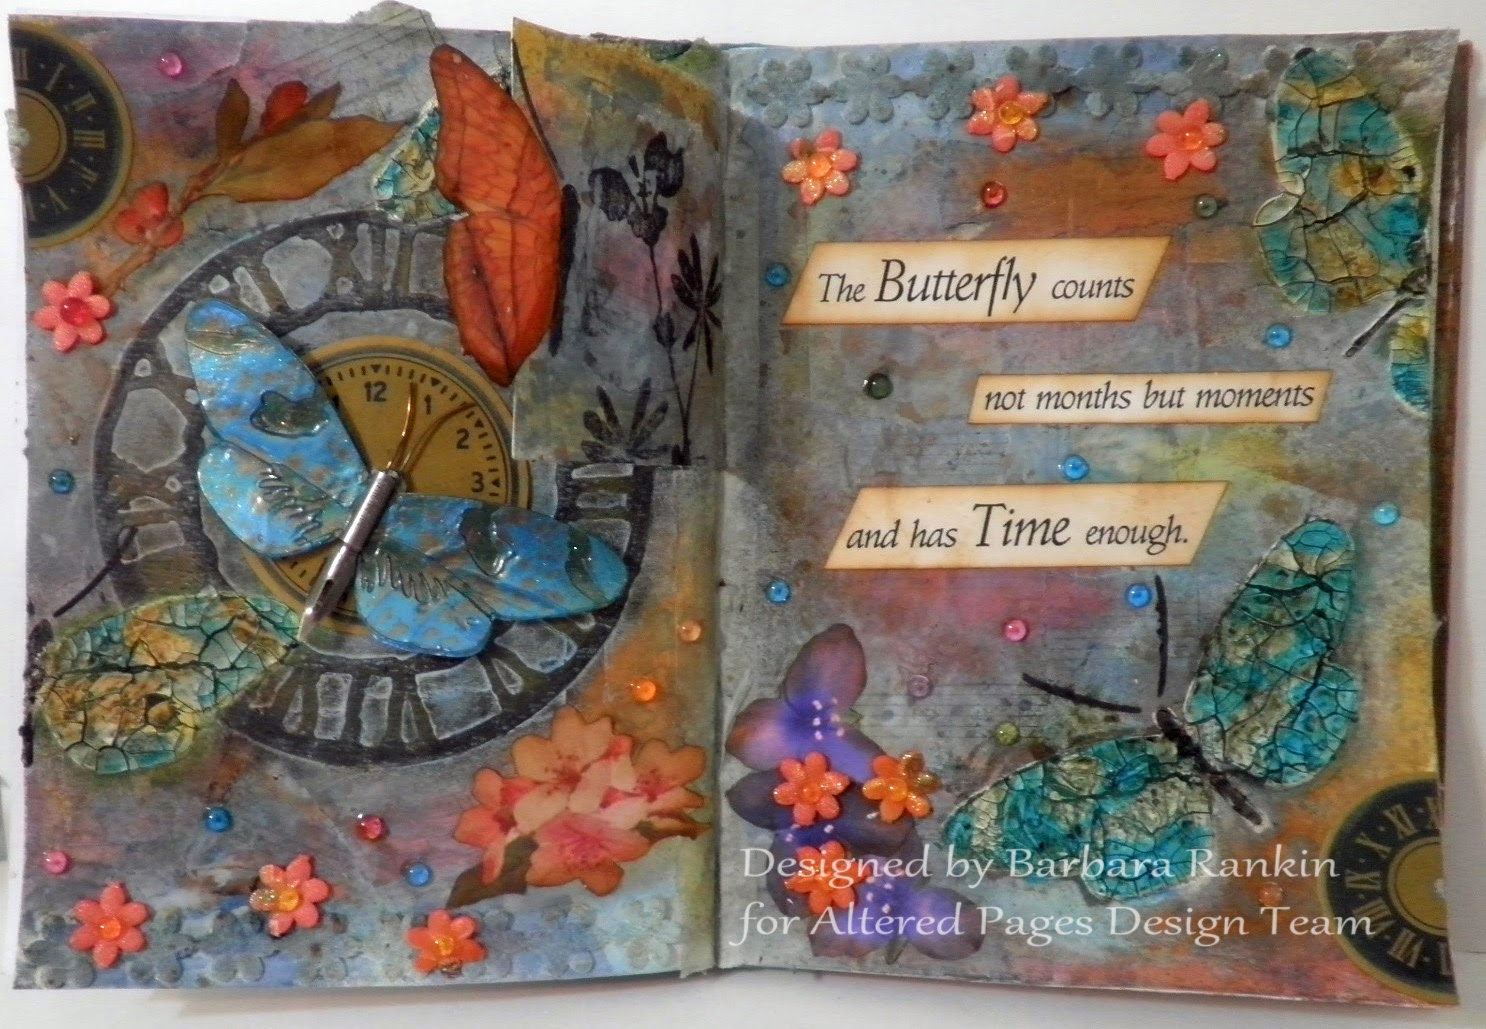
Computer generate the phrase "The Butterfly counts not months but moments and still has Time enough". Cut into strips, aging each strip with Vintage Photo distress ink.
 Adhere to page, as shown in photo below. Various colors of Dew Drops were placed around the page for an added pop of color.
 Place solid stencil onto a piece of watercolor paper.
 Spread Art Anthology Mint Julep Sorbet dimensional acrylic paint through solid butterfly stencil using a spatula onto a piece of watercolor paper. Let dry.
 Spread Art Anthology Baby Blue Eyes Sorbet dimensional acrylic paint through detail stencil and allow to dry.

 Spray Heirloom Gold mist over dried paint. This gave my butterfly a more vintage feel to match the feel of my journal pages.
 Cut out the butterfly and adhere a piece of wire beneath the body for antennae.
 Adhere butterfly to center of clock face, gluing only the body and leaving the wings free. Add a pen nib to the body.
 Fussy cut a butterfly wings from the collage Jar Fairies collage sheet. Edge both wings with Vintage Photo distress ink and blending tool. Glue the outer half of each wing together, as shown.
 Slip the remaining portion over the edge of the tag and glue each side down.
 Flip the tag and yep, the other side of the butterfly. Pretty cool, huh?

 Finish off the tags by stamping flower silhouettes with black ink . Can you see the butterfly body on the tag? Remember you are one antenna on each side of the tag.

Altered Pages Supplies used:
Collage sheets: Spring Florals; Jar Fairies; Klein Postcards
Yellow floral trim
White gesso
Kaisercraft print papers
Large sheet music
Washi tape
Waterbrush
Ranger Blending Tool
Black StazOn ink pad
Maya Road Metallic Mists
Faber-Castell Gelatos
Faber-Castell Big Brush
Kraft Clock Faces
Pen Nibs
Other Supplies used:
Stencil 1 Butterfly stencil set
Distress Spray Stains
Deco Art Media Crackle Paste
Rubber Stamps: A Real Violet, A Real Daisy, Real Dill (Hero Arts)
I hope you enjoyed my mixed media tutorial today, and that I have inspired you to try some of these products from Altered Pages and Stencil 1. They are so much fun, and I know you will enjoy using them. Stop back by to see my next project with my third and final butterfly stencil in this wonderful set. And be sure to visit the AP Blog regularly to see what the rest of the team is working on.
Have a wonderful and oh so creative week!
Barbara
Yes, Stencil 1 has some absolutely wonderful stencil designs and a wide variety, as well. I am sure you will find something to your liking.
My particular stencil came with three sets of butterflies. In my previous post, you can see the altered tag I made using one set. Today, I am going to play with yet another one of the images from the set and use it in my art journal. You may remember the little mini art journal I made and began sharing some of the pages with you. Click here to see that post.
Apply a wash of white gesso over the page once again to bring the elements together.
In the photo below, you can see how the crackle paste took some of the color laid down previously. That is because the distress spray stains are water reactive. I like it, though. It will add to the vintage feel I want.
Here's the process I used to color them. First, rub the Gelatos over the image.
To darken the crackles, I spritzed each butterfly with brown distress ink spray, rubbed the color into the cracks with my finger, and dabbing excess with paper towel.
 Now I want to use the sprays to make some stenciled butterflies directly onto my background. I probably should have done that prior to laying the crackle paste down, but sometimes it just doesn't matter in mixed media. I used the darker blue for this so it would show up a bit.
Add pops of color using pink, ochre, and orange Gelatos randomly over page.
Darken the clock die cut using brown Gelato and smudging with your finger.
Then, to add more depth, I used a Brushstix tool to pick up black distress ink and highlight around the edges.
Choose two kraft clock faces, cut one in half, and color each, direct to paper, with Mix'd Media ink pads in Mossy and then edge with Vintage.
Adhere kraft clock faces to pages, as shown. Adhere the largest clock face inside the die cut.

Trim a length of floral trim, remove wire, and mist with Maya Road Bubblegum Metallic Mist, then spray with water to lighten the color a bit. Allow to dry. Cut the floral trim apart into individual flowers, glueing down as shown for an extra pop of color.
Fussy cut floral images from the Spring Florals and Klein Postcards collage sheets. Age each image with Vintage Photo distress inks. Adhere to the pages as shown in the photos.
Here are a couple of closeups where these images were added to my pages.
Computer generate the phrase "The Butterfly counts not months but moments and still has Time enough". Cut into strips, aging each strip with Vintage Photo distress ink.
Here's what it looks like when completely dry.
Use the detail stencil to stencil in the body of the butterfly half on each side of the tag, as shown. Use a Brushstix and black ink to get the color through the body portion of the stencil only.
Altered Pages Supplies used:
Collage sheets: Spring Florals; Jar Fairies; Klein Postcards
Yellow floral trim
White gesso
Kaisercraft print papers
Large sheet music
Washi tape
Waterbrush
Ranger Blending Tool
Black StazOn ink pad
Maya Road Metallic Mists
Faber-Castell Gelatos
Faber-Castell Big Brush
Kraft Clock Faces
Pen Nibs
Other Supplies used:
Stencil 1 Butterfly stencil set
Distress Spray Stains
Deco Art Media Crackle Paste
Rubber Stamps: A Real Violet, A Real Daisy, Real Dill (Hero Arts)
I hope you enjoyed my mixed media tutorial today, and that I have inspired you to try some of these products from Altered Pages and Stencil 1. They are so much fun, and I know you will enjoy using them. Stop back by to see my next project with my third and final butterfly stencil in this wonderful set. And be sure to visit the AP Blog regularly to see what the rest of the team is working on.
Have a wonderful and oh so creative week!
Barbara
Barb! This is absolutely gorgeous!! What a beautiful mixed media journal spread!! Incredibly inspiring my dear!! Love those butterflies and wings!!
ReplyDeletea real knock out - and a great tutorial - lots of good tips I picked up!
ReplyDeleteI loved reading all the details--the folded butterfly wings are such a delightful surprise--stunning journal pages! Helene
ReplyDeleteYour tutorial is fantastic! The finished piece is gorgeous. The details you create show your eye for perfection.
ReplyDeleteBeautiful pages♥ Thank you for all the wonderful technics !!
ReplyDeleteThank You, Barbara for this wonderful tutorial and such gorgeous pages to feast our eyes on! Fantastic colour and texture! xx
ReplyDeleteBarbara,
ReplyDeleteWhat an amazing job - the pages are absolutely gorgeous!! And, thanks for sharing the step-by-step process!
Beautiful journal page, Barbara!
ReplyDelete