Welcome Friends!
I have a fun little upcycle project for you today using
AlteredPages products including a few great items from Emerald Creek.
I am giving a simple wine cork a glamorous makeover to become a fabulous ornanment using acrylic mirror medallions (those little plastic flowerettes used to secure a mirror to the wall)
Here is a pic of them below and the eye screws that I use to attach to the cork.
I opted for the smaller screws today. If you are going to be hanging a lot of goodies from your ornament you might go for a larger size eye screw.
I honestly cannot take credit for this idea of using the mirror medallions. I did see this somewhere before, but it was many moons ago. I thought I would bring this little trick back for you today. The mirror medallions also come in other smaller sizes. I thought why not go big!!
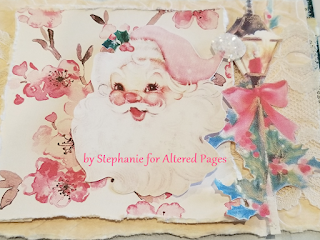
I knew that I was going to be incorporating a beautiful brass cherry blossom charm from Emerald Creek so I utilized some of the cherry blossom collage images from Altered Pages. You can find them here. I also wanted to make a matching card and this is where Santa comes in. You can find the other collage images I used here and here.
Okay on with the project...So, start with a wine cork...add vintage text page, embossing powder and vintage chunky clear glitter. Set this aside. You can see the cork partially done here....this is before the glitter and cherry blossom images.
Let's work on that matching card.
I used a pre-made card and added many layers to it. There are scraps of vintage text page, Emerald Creek Northern Lights embossing powder, more soft pink cardstock that I ran through the cuddle bug to add a swirl texture, pretty white lace and the all-important collage images. I have a torn piece of cherry blossom paper, a beautiful vintage lantern and good old Santa himself.
I then added a bit of the Northern Lights embossing powder to the sides of the card and topped off with more of the chunky clear glitter. I also added the glitter to Santa's pompom on his hat and the flame of the street lantern.
Okay, back to that ornament.....
I added the cherry blossom images that I previously fussy cut. Adhered the mirror medallions with the eye screws and threaded festive iridescent ribbon through the top and bottom screw. The top one is for hanging and the bottom one is for the ever so important bling and cherry blossom charm.
I added a few crystals and flat back pearls to the ribbon tendrils for an extra bit of pretty.
I hope you were inspired to create an upcycle project of your own. Let Altered Pages help you and it is sure to be a hit! Please share your projects with us on FB. We love to see what you create as well.
Have a great weekend and
Happy Thanksgiving!
Stephanie
Here is the supply list so you can pick up everything you need to recreate this fun and easy project.
Sentimental Christmas collage sheet
Perfectly Pink Christmas collage sheet
Cherry Blossom Pink collage sheet
Versamark embossing inkpad
Northern Lights embossing powder - Emerald Creek
Brass Cherry Blossom charm - Emerald Creek
Ribbons and Lace
3d Foam Mounting Squares
Jewelry Packs for crystals and bling
Vintage text pages (those of you that follow me - wow - do I use vintage text in like 98% of my projects or what?!?! - it is one of my go to elements and it should be yours too)
Wine Cork


Comments
Post a Comment