Hi Gang! We have almost made it to October...
color me HAPPY!
I have for you today a little explosion box to wrangle all those cute little tags we have all been making this month.
I thought let's make a crafty vessel, if you will, that's perfect for giving Halloween treats to your favorite ghoul.
Maybe you know someone who can't have or isn't fond of candy...well, this is a perfect way to share some treats with them.
Just pen a sweet little note on each tag and add a little gift inside this explosion box.
Let's begin...I will try my best and let the pics do the explanation for the most part.
click on the photos to read the instructions
I hope you can see the score marks (made with my my trusty scor-pad and bone folder.) I then cut the right hand side of each score line. See example. If done correctly you will have these fun little flaps. These are going to become pockets for our tags.
Cut "flaps" on the diagonal to create your pocket. Depending on the direction of the cut, this will determine the orientation of your pocket. We will be alternating with right sided and left side pockets. Then add thin line of Tacky Glue or double side tape to the bottom edge of your flap, fold to the left and adhere to the bottom edge to create a pocket. Repeat this process for all layers. I have created three layers for my box. I inked the edges of pretty much everything. It just sets it all off. I used purple ink, black ink and Prima Ginger Sparks to add a little something to the edges.
Next came adding a bit of color to each of the pockets. I used these Halloween Paper Packs. Some of which were left over from my last project which you can find here. I cut squares in 3 inches, 3.5 inches and 4 inches. Then they were cut on the diagonal to fit the pockets then adhered with Tacky Glue. I left some squares intact to decorate the backs of the pockets. Repeat this process for all three layers. Again, I inked or finger painted the edge of all papers that were added.
Here are just some of the tags that I made to add to the explosion box. Just add a sweet note and tuck away in one of the many pockets.
And we have the finished project with all of
the decor items and embellies added...
I just love the shimmery trims, ribbons and washi tapes.
Here I show it with a spooky vintage spider necklace on a bed of tulle when the box explodes open...
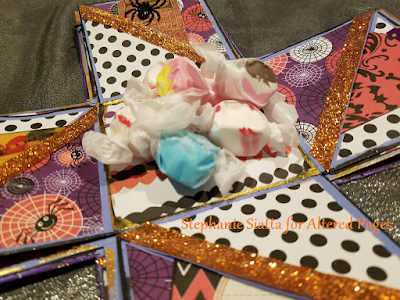
And, here we have some good ole' fashion salt water taffy in case your ghoul has a sweet tooth.
Just look at the cute pumpkin ribbon trim.
I added a bit of cup chain to the lid for just a bit of added bling
as well as that beautiful Prima flower.
Be sure to sign and date the back...
Here are the directions for the lid.
The dimensions for the lid are...
7 1/8 inches x 7 1/8 inches
Score at 1.5 inches on all sides.
Then cute along the inside edge of the overlapping score line
Crease on the score line and fold inward and glue to create a box shape.
Then decorate!
I am so glad you joined me today...
Some paper scraps, pretty tags, card stock and fun embellishements and you can make your very own explosion box (based on any theme you choose) as easy as well...Pumpkin Pie!!!
Have a great weekend - thanks for spending your Friday with me
Steph S.
Supply List -


Comments
Post a Comment