
Happy Friday, gang! We made it! Another week tackled, yay us!!
Now, for some crafting fun. Today, I have for you a "mostly" quick fall foliage tag that would make a great addition to a hostess gift or greeting card. And, we all know there is an endless need for those quick little gifties this time of year.
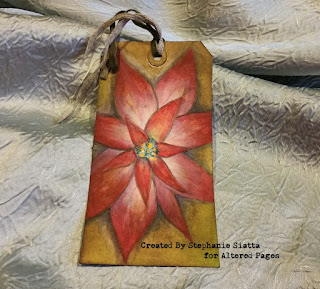
 I am keeping with my trend for this month and that is water colour. In my post a couple weeks ago I decided to get back to what I truly love and that is painting with watercolours making a pointsettia tag. And, here that is below.
 I am keeping with that trend today. And, you will see that both of my posts involve tags. I think most of us love tags because the size makes them manageable. Even if you want to get really intricate a tag is still a type of project that can be completed in an hour, an evening, etc.
Let's get going.......
I began with a page from my Dylusions Journal. Did you know you can just create on that wonderful paper and rip that page right out of your journal to use however you want? Yes, you can. And, for some of you wondering, no, this is not 300 pound cold pressed watercolour paper. However, for this application it is just fine.


Now, for some crafting fun. Today, I have for you a "mostly" quick fall foliage tag that would make a great addition to a hostess gift or greeting card. And, we all know there is an endless need for those quick little gifties this time of year.


Let's get going.......
I began with a page from my Dylusions Journal. Did you know you can just create on that wonderful paper and rip that page right out of your journal to use however you want? Yes, you can. And, for some of you wondering, no, this is not 300 pound cold pressed watercolour paper. However, for this application it is just fine.

So, I began with a quick sketch.
Don't be too heavy handed as you will
need to erase most of your pencil marks
so they don't show through your final image.

Then, begin applying your watercolour.

Give your image some dimension by adding darks and lights.

Next, I choose the tag/s. These were tags where the background was previously created with the forethought that they would someday be used for something great. The green tag was done with multiple shades of mists and inks after "wrinkling" the tag.
The amber tag was created with multiple shades of golds and amber ink pads applied directly onto the tag. You can see that there is also a stamped image of the Eiffel Tower...sorry today we only need the background. Paris, you will have to wait.

I then adhered the green tag to the gold tag using 3/8 inch double side tape. I added a few pieces of beautiful ribbon fibers and seam binding that I dyed with coordinating inks. Next, came attaching the fall leaf to the tag. I did this by applying Zig 2 Way Glue Pen to the back of the leaf. This makes those small intricate cuts adhere perfectly.

Attach this beautiful tag to a wine bottle, tea towel or gift basket and you will certainly convey how Thankful you are for your Holiday Hostess.
I hope you enjoyed this little tag! I 100% enjoyed playing with my true love, watercolour, in a quick way that tackles multiple uses. Gotta love painting therapy for me
and a hostess gift for someone special.
Thanks so much for joining me.
Stephanie Siatta
for the
Altered Pages Design Team
Here is a quick supply list....
Fabulous art. Love it.
ReplyDeleteBeautiful
ReplyDelete