
Well, here is my first post as a new Design Team member at Alteredpages.com. I hope you enjoy this altered box project.

Supplies:
Matte Medium
Ephemera pack
Dew Drops - getaway
Collage sheet - Sepia Collage
Scrapbook papers
Fabric and paper flowers
random box from my stash
random other bits and pieces, metal gears, etc., from my stash
Stickles
Ribbon
Gelatos
Crackle glaze
Ink pads
 After I had found a small box that I wanted to alter, I removed the cross bracing from it. Then I cut possible images from my collage sheet. I like to play around with composition so I cut out a few different ones. I never know for sure what I will end up using.
 In this picture you can see the cross bracing that was inside originally. At this point, I went through my paper stash and found some great leathery textured paper to use on the inside of the box. Use matte medium to adhere the paper to the box. I also like to use the matt medium on top of the paper for a more aged look.


Here you can see the leathery paper inside the box/ I used some gelatos in random places on the leathery textured surface and then rubbed them down into the paper to add more color and aging. Then I found a great aged looking, paper to compliment it. I tore that into strips, inked the raw edges and used it to cover the sides and back of the box. Using the matt medium again to adhere paper and a coat over the finished box.
 Here I have taken apart the cross bracing and am gluing it to some complimentary striped paper. You are seeing the opposite side here.. You can see the actual paper pattern in the following photos.I had to trim down the edges of the bracing, as the paper layers added to the box, made the inside measurement smaller.
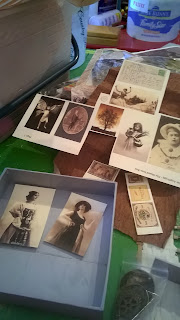
 Here I am, trying to narrow down my selection of items to use in the box. So many great choices to be found at Alteredpages.com.
 I decided on these two lovely sepia ladies to be my focal images. I adhered them to some black chipboard, then fussy cut them out.
 Once they were cut out, I didn't want the edges of the board to show (the black chip board had a white core- ugh) so I used my trusty gelato in brown to match the sepia tone. I rubbed along the edges and then rubbed away any excess. They really blend well.
 Here is the finished altered box after I added all the goodies, a little stickles glitter around my ladies and to add a bit more bling, inked the edges and a little crackle medium here and there. Hope you enjoyed my very first project for Alteredpages.com, I sure did!
Happy Fall!
Jen Rothstein @ Dog-Ma Studio


Supplies:
Matte Medium
Ephemera pack
Dew Drops - getaway
Collage sheet - Sepia Collage
Scrapbook papers
Fabric and paper flowers
random box from my stash
random other bits and pieces, metal gears, etc., from my stash
Stickles
Ribbon
Gelatos
Crackle glaze
Ink pads


Happy Fall!
Jen Rothstein @ Dog-Ma Studio

Great project, Jen! I love your shadow box.
ReplyDeleteThank you Robin!
Deletethis is fantastic! xo
ReplyDelete