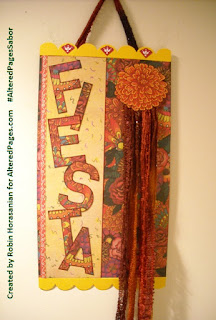
Hi everyone! Happy Friday. It's Robin today and I have a fun and colorful party banner to share with you today. We've seen a beautiful banner from Lyneen for Cinco de Mayo. The one I'm sharing with you today is for that or any other occasion you choose to celebrate.
My project begins with a sheet of lovely Ramitos paper by Sabor, cut down to 12" x 6 3/4". This paper is a wonderful heavy weight and makes a great base for my banner. A second sheet of Ramitos was used to cut out the letters in "FIESTA" using a 30 year-old-set of stencils. Stencils are great tools to have in your crafting toolbox because they are good forever. Altered Pages has a nice selection to choose from if you're looking for some. I moved the letters around until I found the right balance of colors for each one.
Once the letters were cut out, I traced around the outer edges of each one with a berry colored permanent marker to bring out more of the pink in the design. I needed a light background to highlight the letters and a 12" x 3" strip of Celebrar was just the thing. I still have the top and bottom of this fun design to use on another project! This confetti panel was adhered with double sided tape. I cut off a small red border strip from celebrar and taped it next to the first panel to give it a little more pizzazz.
The top and bottom borders of my banner are scrapbook edges by Bazzill. These pre-cut borders come in many colors and shapes and were glued in place with Tacky Glue. I wanted scallops to offset the straight lines of the letters. Ribbon that I received in my Gypsy Mailbox Muse kit was glued onto the back of the border and then scraps of the same color paper were glued over the top. I didn't line them up perfectly - mostly because I didn't think about it until the were dry - but they still camouflage the fact that the ribbon has frayed edges from being cut to size.
My project begins with a sheet of lovely Ramitos paper by Sabor, cut down to 12" x 6 3/4". This paper is a wonderful heavy weight and makes a great base for my banner. A second sheet of Ramitos was used to cut out the letters in "FIESTA" using a 30 year-old-set of stencils. Stencils are great tools to have in your crafting toolbox because they are good forever. Altered Pages has a nice selection to choose from if you're looking for some. I moved the letters around until I found the right balance of colors for each one.
Once the letters were cut out, I traced around the outer edges of each one with a berry colored permanent marker to bring out more of the pink in the design. I needed a light background to highlight the letters and a 12" x 3" strip of Celebrar was just the thing. I still have the top and bottom of this fun design to use on another project! This confetti panel was adhered with double sided tape. I cut off a small red border strip from celebrar and taped it next to the first panel to give it a little more pizzazz.
More of these festive ribbons were added to the front. I took two long strands, folded in half, and stapled them to the background and then added a chrysanthemum embellishment from the AMOR Cut Outs pack to the top using foam adhesive squares. Three of the little corner embellishments in the same pack were glued to the top border.
I think it looks different everywhere I hang it!
Below is a scan because I think it shows off the beautiful floral paper better than a photo. For some reason, the sparklies in the ribbon don't show in the scan.
If you enjoy projects with jewel tones and bright colors you really need to check out these beautiful designs by Sabor. When you do, be sure to share you projects on our Facebook page with the tag #AlteredPagesSabor


I adore this one! Such a great piece to have for any party and for Springtime! I see TACOS in your future!
ReplyDelete