Valentines and Merry-Go-Rounds--I don't think there could be a sweeter combination. Ok, admittedly there's peanut butter and chocolate, but a Valentine Carousel wins the non-food category.
I'm Betsy Skagen of Paper Calliope and while I love Reese's Peanut Butter Cups, I managed not to eat any while I was making this carousel and thus smudge it with chocolate. (Though, I can't claim the same thing for my keyboard).
Tutorial to make the Vintage Valentine Carousel
Begin by painting the individual components of the chipboard carousel frame with red, white and pink acrylic gloss paint.
After it dries, assemble the carousel frame (except for the top) with a strong adhesive and cover the entire thing with a couple coats of gel medium. Let dry.
Paint both sides of the horses with acrylic paint in pastel colors. Dry, then cover horses with gel medium. Dry again.
Print out hearts from To Thine Own Self be True Collage Sheet at a reduced size, fussy cut and adhere to the tented top with gel medium. Apply another coat of gel medium over images. Set aside to dry.
Scan one of the horse die cuts that came with the carousel, and make six altered versions in a photo editing program. Print onto white cardstock. Then flip the image horizontally in your photo editing program and print a second copy onto white cardstock.
Fussy cut the the horse graphics and adhere to both sides of the horse chipboard with gel medium. Seal over the top of the graphic with another coat of gel medium.
When the horses are dry, use a utility blade to chip away some of the paint on the edges to distress the poor little horses. Ink distressed points with brown ink. After all, this is carousel that has been well loved by children.
Print Always in Love Collage Sheet, Heartily Agree Collage Sheet, A Piece of My Heart Collage Sheet and the Valentines of Youth Collage Sheet onto white cardstock. Flip the sheets horizontally in a photo editing program, cover the reversed lettering with a clone stamp, and print a second copy onto white cardstock. Fussy cut the children out and glue back-to-back. Adhere the children to the back of the horses.
Print a valentine graphic onto vellum. Cut this into a rectangle. The short sides should be the slightly smaller than the height inside the carousel. Adhere two edges together to form a tube similar in width to a paper towel tube.
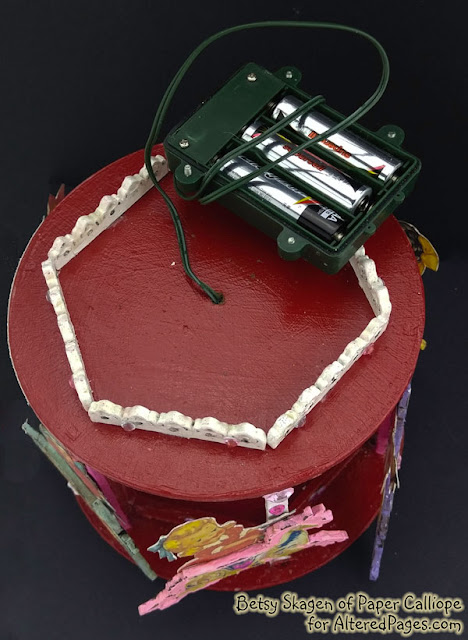
Drill a hole in the top of the carousel and guide a small set of batttery-operated lights through the hole into the vellum tube. You can then hide the battery pack under the carousel top.
Adhere the horses to the carousel poles with a hot glue gun.
Punch a hole in the tented top and hot glue a section of straw in the hole.
Add bling,hearts and other decorations. Once you turn on the lights, your carousel is done!
Thanks for stopping by Altered Pages. Have a sweet day!
Great Stuff
- Always in Love Collage Sheet
- Heartily Agree Collage Sheet
- A Piece of My Heart Collage Sheet
- Valentines of Youth Collage Sheet
- Valentines of Yesterday Collage Sheet
- To Thine Own Self be True Collage Sheet
- Gel Medium
- Carousel kit from Retro Cafe Art
- White cardstock
- Vellum Paper
- Inkjet printer
- Vintage Photo Distress Ink
- Acrylic paints
- Adhesives
- Embellishments & bling
- Battery-operated light set


The Merry Go Round is so beautiful♥ I can hear the music!!
ReplyDeleteThank you Jackie!
DeleteLove all the fun eye candy! As always wonderfully done Betsy!
ReplyDeleteThanks Tonya. You are always an inspiration.
DeleteWhat a memory of childhood, everyone loves the merry-go-round! Great job Betsy!
ReplyDeleteThank you.
DeleteWhere can the Merry Go Round be bought?
ReplyDeleteJackie, I bought mine at Retro Art Cafe.
DeleteWow Betsy this is totally adorable, fabulously done! xx
ReplyDeleteThank you Danie. Somehow Valentine's Day and retro cuties go so well together.
DeleteWhat a fun project! So cute!!!!
ReplyDeleteThank you Dana! It was fun and it cheers me up every time I walk by it.
DeleteFun project and super cute!
ReplyDeleteThank you Robin. You are so sweet.
DeleteSo many details! Fantastic!!
ReplyDeleteThanks Jess. xoxo
DeleteSo cute--love the light up feature, YES!!!!
ReplyDelete:)
Thank you Trisha. I'm a sucker for adding lights to projects!
Delete