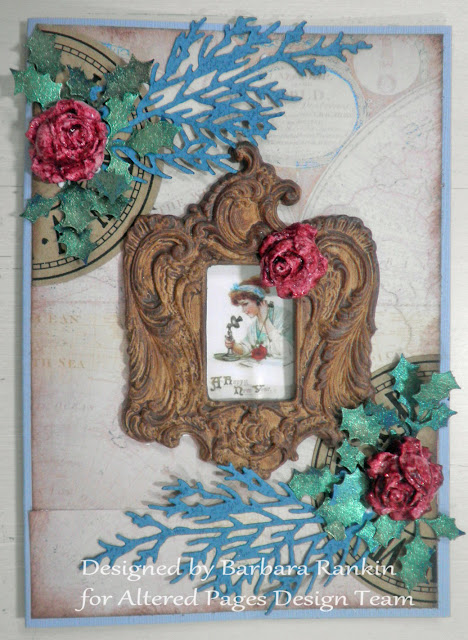
Happy Holidays, friends! I hope everyone had a very Merry Christmas! I want to share a mixed media card with you today using molded embellishments made with PermaStone Casting Compound from Activa® . This product is quite versatile and very easy to use.
I mixed the PermaStone casting compound per the package directions and poured it into my roses and frame molds. I got busy making multiple pieces because I was having so much fun. The PermaStone dries pretty quickly, in about 20-30 minutes.
When completely dry, I removed from the mold and gave each piece a coat of glaze medium.
Next, I coated each piece with Timeless DecoArt Chalk Paint.
I painted three roses with Red Velvet Art Anthology Sorbet paint. This paint is dimensional and thick, and has a beautiful glitter in it. It even has a translucency to it if painted on thinly.
I added water to a blob of burnt umber acrylic paint to make a wash to cover the frame. Set frame aside to dry.
Now let's make the card base. Cut blue card stock to 10" x 7", fold in half to make 5" x 7" card base. Remove world map page from the Happy Travels 6x6 Paper Pad and cut at 4-3/4" x 6", and the extra strip needs to be trimmed at 4-3/4", leaving a small square piece.
I mixed the PermaStone casting compound per the package directions and poured it into my roses and frame molds. I got busy making multiple pieces because I was having so much fun. The PermaStone dries pretty quickly, in about 20-30 minutes.
When completely dry, I removed from the mold and gave each piece a coat of glaze medium.
Next, I coated each piece with Timeless DecoArt Chalk Paint.
I added water to a blob of burnt umber acrylic paint to make a wash to cover the frame. Set frame aside to dry.
Resize and print lady on telephone from the Very Vintage New Year collage sheet and glue behind frame opening.
Ink up the edges with Leather Mix'd Media ink pad using the Blending Tool.
Glue large piece to card front, as shown.
Glue small strip to bottom over the first piece. Do not worry about the seam. It will be covered up in later steps.
Cut a Kraft Paper Clock in half and adhere to card front, as shown.
Die cut or punch some foliage from green card stock and begin gluing the pieces, as shown. Center and glue the framed piece, as shown.
Punch some holly leaves from green card stock and bling them up with a wash of the green and gold mica paints from the Mica Paint Palette using a Waterbrush. Let dry.
Arrange and adhere the leaves with the red molded roses, as shown. Aleene's Tacky Glue works really well for holding everything in place.
Here are a few more close-ups of the card.
Altered Pages Supplies:
Very Vintage New Year collage sheet
6x6 Glitz Paper Pads (Happy Travels)
DecoArt Chalk Paint (Timeless Cream)
Art Anthology Sorbet Paint (Red Velvet)
Mica Paint Palette (Pearlescent & Metallic)
Waterbrushes
Mix'd Media Salazar Inkx (Leather)
Ranger Blending Tools
Kraft Paper Clock
Gel Medium
Other supplies:
PermaStone Casting Compound
Blue card stock
Green card stock
I hope you enjoyed my heavily embellished card today. I love making dimensional cards as long as I can either send it to the recipient in a box full of goodies, or hand deliver it. They are always wowed by cards with such dimension and never throw these in the trash can. Well, having said that, I hope I have inspired you to try making one for a special person in your life.
Remember, the Altered Pages design team shares even more inspiration daily on the Altered Pages blog. Stop by and see what they are up to. Many thanks to Activa® , our sponsor this month. Check out their website for a complete look at all of the products they carry.
Thanks for stopping by, and have a very Happy New Year!!!
Barbara


wow - another knocked-out-of-the-park beauty! Is that frame mold from the same company that makes the air dry compound? I must have one of those!
ReplyDeleteThanks so much, Tristan, for your sweet comments. You always make my day. The mold came from an Australian company called Krafty Lady Art Moulds, and I bought them from a US company called After Midnight, probably 10 years ago. Here is the link: https://www.amstamps.com/shoppingcart/agora.cgi?product=MOLDS_FRAMES They are not cheap, but they work beautifully.
DeleteWhat can be said Barbara? You always create beauty with your care and special touches. Thanks so much!
ReplyDeleteThanks so much, Jean. Your sweet comments made my day, too! :)
DeleteBarbara,
ReplyDeleteAnother most beautiful project - I love your art! And, I always learn something new!! Happy New Year!