Happy Monday, friends! Barbara here today. I suppose you know by now that the Altered Pages team are working with some really cool products from Activa® this month. I get to play with two products, Lumina Air Dry Polymer Clay and PermaStone Casting Compound. Check back in two weeks to see what I make with the PermaStone Casting Compound.
But today, I want to share this sweet little angel I made using a lowly paper mache cone and Lumina air dry clay.
 Tear strips of paper from the 6x6 Glitz Happy Travels Paper Pad and adhere to cone with Gel Medium. Leave areas open to adhere strips of Music Sheets, but do not cover cone completely.
 Use a spatula to spread an uneven coat of crackle paste in those blank areas left between the sheets of paper.
 Use waterbrush to color cone with the Mica Paint Palette colors.
 I added color after color until I liked the result.
 After my layers of colors dried, I decided to go for a lighter effect, so I used a baby wipe to remove some of the paint layers. As you can see, the watercolors remove easily, so I was able to go back to revealing my music sheet prints. However, lots of the watercolors were left in the nooks and crannies.
 I wanted to add more translucent color, so I brought out my Splash Inks and began adding Blue with a baby wipe. I could control the amount and transparency of the color easily.
 Next, I began adding the Magenta ink in the same manner. Set cone aside to dry.

 I have quite a few molds in my stash, and these products from Activa® are the perfect complement. Check out the molds available from Altered Pages.
 I used the Lumina Air Dry Polymer Clay in an old wings and face mold I have had for years. It is a hard mold, so I used brushed a light coat of baby powder over it before adding the clay. The really cool thing about this clay is that it is polymer clay, but it air dries. It is super easy to use, and very soft and malleable.
 When the clay air-dried, I removed it from the mold and began painting the face with various acrylic paints and the wings with ivory paint.
 Altered Pages has a nice selection of paints and brushes, too. I even used my Waterbrush with the acrylic paint. They are not just for water colors, and quite handy, too! If you don't squeeze it, the water stays put inside the reservoir, but if you need to thin the paint a bit, just squeeze for a watered-down paint, or for cleaning the brush when finished using the paint.
If you don't have a face or wings mold, then check out these great Altered Pages collage images in the Angels/Fairies section. Any of these would look awesome for your angel or fairy projects.
I next painted the front and back of the wings with gold from the Mica Paint Palette.
 I rubbed some of the gold off to bring back the ivory color for a shabby chic look.
 Next, I added a very watered down bit of the black from the Mica Paint Palette. This brought out the details in the wings while giving it a more vintage look. Do this on both sides, front and back, of each wing.
 I found a metal embellishment to put behind my angel face. Here are the parts so far.
 I glued the clay angel face to the metal embellishment, then to the top of the cone, as shown. I used Aleene's Tacky Glue for this.
 While that was drying, I painted one of the chipboard Snowflakes on both sides with White Gesso and allowed it to dry. Then I coated both sides with Stickles Stardust glitter glue for extra sparkle.
 I cut a 5" piece of twisted wire (any heavier gauge wire will work) and bent it into the shape of arms.
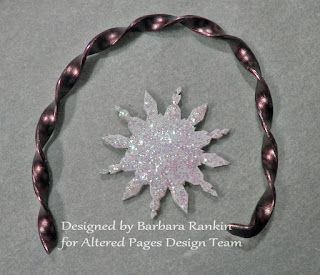 I made holes in the cone and inserted the wire through the holes. Use pliers to straighten and flatten the ends for the next step.
 Glue the snowflake to the wire ends to appear as though your little angel is offering you a snowflake for a white Christmas. How sweet is she?

 And finally, our little angel needs her wings. So I used the Aleene's Tacky Glue again to glue them to each side of the cone, as shown.


Altered Pages Supplies:
Paper Mache Cones
White Gesso
Gel Medium
Assorted Flowers
Music Sheets
Waterbrushes
Mica Paint Palette
Splash Inks
Aleene's Tacky Glue
Snowflakes 6 pieces
Stickles (Stardust)
Glass Glitter (Ocean Blue)
Be sure to check back daily to see more from our design team as they work with ACTIVA® products!!!
 And remember our giveaway... comment each day for more chances to win this Celluclay book!

But today, I want to share this sweet little angel I made using a lowly paper mache cone and Lumina air dry clay.


If you don't have a face or wings mold, then check out these great Altered Pages collage images in the Angels/Fairies section. Any of these would look awesome for your angel or fairy projects.
I next painted the front and back of the wings with gold from the Mica Paint Palette.


For an added bit of sparkly glitz, I added the Ocean Blue Glass Glitter, making random "patches" of glue and sprinkling the glitter over it.

 |
| close-up of glitter patches |
And here she is, one more time, looking up to the Heavens like the sweet angel she is.

Paper Mache Cones
White Gesso
Gel Medium
Assorted Flowers
Music Sheets
Waterbrushes
Mica Paint Palette
Splash Inks
Aleene's Tacky Glue
Snowflakes 6 pieces
Stickles (Stardust)
Glass Glitter (Ocean Blue)
Gold crackle paste
White crackle paste
Heavy gauge wire
Be sure to check back daily to see more from our design team as they work with ACTIVA® products!!!

As always, thanks for visiting, and I hope you were inspired to try one of these cute angels for yourself, or maybe for someone special. I think they would make the most fabulous gift this holiday season.
Until next time, thanks again, and keep on crafting!
Barbara
Barbara, this is just stunning! I love colors used, and her face is beautiful. I want to see a whole tree decorated with just these ornaments -it would be a heavenly choir!
ReplyDeleteWonderful job (as always!)
Barbara, STUNNING. Your work always has the most perfection and detail. Love the color layers you did.
ReplyDelete