I love holidays... ALL holidays! Thanksgiving being one on my favorites. It is a day my family shares our meal with friends and family. We have a wonderful time... it is wonderful spending time in the kitchen with the wonderful women in my life and my husband who is my biggest helper before everyone arrives. He always peels all the potatoes!!

For the table this year I decided to make place markers using wooden spoons from Altered Pages with the Altered Pages Altered Spoons Collage Sheet! These would be a lot of fun for children to make ay a children's party... or you can make them for any occasion!
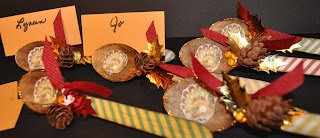


For the table this year I decided to make place markers using wooden spoons from Altered Pages with the Altered Pages Altered Spoons Collage Sheet! These would be a lot of fun for children to make ay a children's party... or you can make them for any occasion!

These will add a festive touch to any table!

Supplies:
Pinecones from the Park
Leaves - Confetti
Small Clothes Pins

Ink the bowl of the wooden spoons and edges.

Cut strips of paper a little wider than the handle, use emery board or sand paper to smooth down the edges and remove excess paper.


Cut images from Altered Pages Altered Spoons Collage Sheet to fit in the bowl of the spoon, lightly ink edges, adhere to the spoon using glue stick.

Cut ribbon 7 inches, tie in a knot around the neck of the spoon, move the knot to the side.

Add a thin line of Stickles around the bowl of the spoon. With tacky glue attach leaves and small pine cones.


With tacky Glue add a small clothes pin to the back of the spoon to hold a card with name (also balances the spoon.)

HAPPY THANKSGIVING!!!
Such a delightful idea! They get to take this home and use again as a recipe holder or decor item. They could even write a note or date on the card. LOVELY!
ReplyDeleteGreat job Lyneen!
ReplyDeleteGorgeous! I'll have to get started on this for next year! xo
ReplyDeleteVery creative♥
ReplyDeleteFun idea for placemarkers. Thanks for the idea!
ReplyDeleteWhat a creative idea!
ReplyDelete