Hi everyone. Barbara here with my Altered Pages DT post using these adorable wooden spoons. I decided to go out of my comfort zone, i.e., think outside of the box. My first thoughts were to decorate the spoons as just that, spoons, but then I decided to use them as architectural elements instead. I must say, I am quite happy that I did.

Cover an 8x10 Canvas Panel with Burlap using Aleene's Tacky Glue. Spread gold crackle paste through a stencil, keeping edges uneven for that artsy look.
 Allow the paste to dry and crackle naturally on the canvas.
 Mix one drop of Blue Splash Inks into an Ultra Fine Mist Sprayer, fill sprayer with water, and randomly mist the light blue color over the canvas, concentrating on the gold stenciled areas for contrast.
 Paint three Wood Spoons with Timeless Cream chalk paint and let dry. Use a spatula to spread white crackle paste over one side of the spoons and allow to dry naturally to form the best crackling effect.
 Mix one drop of each Blue and Magenta Splash Inks onto craft sheet, mix with water and brush over the crackled spoons. Dry with heat tool.

 Use a waterbrush to mix some gold from the Mica Paint Palette (Metallic) and paint over each spoon. See closeup photos at end of post.
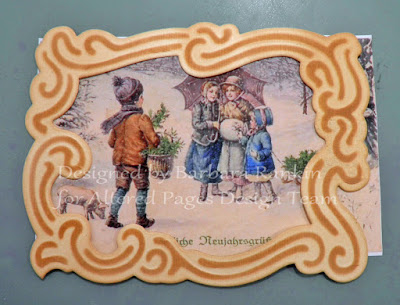
Print and cut out children with umbrella image from the Snow Days in Europe collage sheet. Die cut a frame that will show off the image, moving it around to reveal the portion of the image you like most. Trim off excess collage paper and adhere frame to image. (TIP: Before removing frame from metal die, use your Ranger Blending Tool to add shading with Peanut Brittle Memento Luxe Ink Pad.
 Trim a piece of 6x6 Black Mat Board to fit beneath framed collage image and adhere to back. This will not only give it a nice, strong backing, but also pop it off the canvas for added dimension.
 Add some beautiful glitter effects to the image and frame with the Wink of Stella clear glitter pen. It really adds a vintage feel.
 Die cut music notes from cream card stock, use your Ranger Blending Tool to add shading with Peanut Brittle Memento Luxe Ink Pad, and Stardust Stickles glitter glue for extra sparkle. See closeup photos at end of post.
Cover some chipboard snowflakes with White Gesso and let dry. Coat three snowflakes with one of each color Pigment Metallic Ink Cubes (Silver, Shimmer Pink, Shimmer Blue), let dry. Use a heat tool to speed the drying time.
 Mix two drops of Blue Splash Inks into an Ultra Fine Mist Sprayer, fill sprayer with water, and mist approximately one yard of Dyeable Seam Binding to add color. Use heat tool to speed up drying time.
 Use a water brush to mix gold metallic mica paint from the Mica Paint Palette (Metallic) and add it to the wet seam binding.
 Dry with heat tool, leaving it in a clump so it will crinkle for a nice, vintage effect.
 Cover holly berry gold German Scrap with Niji Oil Pastels, cut into thirds and adhere beneath flowers. Altered Pages has a nice selection of German Scrap.
 Add all the pieces to the canvas, as shown in the finished photo below.
 Adhere the collage image over the tops of the spoons, and layer Petaloo flowers on either side. The pieces of cut up holly berry German scrap was placed around the flowers.
 "It's the most wonderful time of the year" sticker was cut apart and adhered to the left side, as shown. The spoons were adhered slightly beneath the framed image. The seam binding was tied into a bow at the base of each spoon, and a hole was punched through each snowflake so that a lightbulb safety pin could go through it and hang from the bows.
 You can see the pretty gold mica paint on the spoons now. Metal embellishments were added to the snowflakes and spoons. The music notes die cut was also adhered just above the bows and attached to the spoons.
 Place canvas inside a frame. I found this one at the Dollar Store, so I wanted to change the color a bit, using Gilder's Paste (Foundry Bronze) and Patina. Three sides were rubbed with the Patina, while the fourth (left) side was left plain for you to see the difference in the photo.

Altered Pages Supplies:
Collage sheets: Snow Days in Europe
Wood Spoons (5)
Canvas Panel (8x10)
6x6 Black Mat Board
Burlap
Aleene's Tacky Glue
White Gesso
Snowflakes 6 pieces
Dyeable Seam Binding
Mica Paint Palette (Metallic)
Waterbrushes
Ultra Fine Mist Sprayer
Gilder's Paste (Foundry Bronze)
Niji Oil Pastels
Assorted Flowers
Stickles (Stardust)
Light bulb safety pins

Cover an 8x10 Canvas Panel with Burlap using Aleene's Tacky Glue. Spread gold crackle paste through a stencil, keeping edges uneven for that artsy look.


Print and cut out children with umbrella image from the Snow Days in Europe collage sheet. Die cut a frame that will show off the image, moving it around to reveal the portion of the image you like most. Trim off excess collage paper and adhere frame to image. (TIP: Before removing frame from metal die, use your Ranger Blending Tool to add shading with Peanut Brittle Memento Luxe Ink Pad.


Altered Pages Supplies:
Collage sheets: Snow Days in Europe
Wood Spoons (5)
Canvas Panel (8x10)
6x6 Black Mat Board
Burlap
Aleene's Tacky Glue
White Gesso
Snowflakes 6 pieces
Dyeable Seam Binding
Waterbrushes
Memento Luxe Ink Pads (Peanut Brittle)
Pigment Metallic Ink Cubes (Silver, Shimmer Pink, Shimmer Blue)
Chalk Paint (Timeless Cream)
Splash InksUltra Fine Mist Sprayer
Gilder's Paste (Foundry Bronze)
Niji Oil Pastels
Assorted Flowers
Stickles (Stardust)
Light bulb safety pins
Other supplies used:
Gold crackle paste
White crackle paste
Stencil
Dies: Decorative Frame, Music Notes
Metal embellishments
Word stickers
I hope you enjoyed my project today and are inspired to get creating for the holidays, whether for home decor or gift giving.
Thanks for stopping by, and have a wonderful, Happy Thanksgiving!!!!
Barbara
Dies: Decorative Frame, Music Notes
Metal embellishments
Word stickers
I hope you enjoyed my project today and are inspired to get creating for the holidays, whether for home decor or gift giving.
Thanks for stopping by, and have a wonderful, Happy Thanksgiving!!!!
Barbara
Barbara, I can only say that when I saw your post, it took my breath away for a second! Simple wooden spoons became a true work of art. You keep getting better and better! Thanks for sharing this wonderful art.
ReplyDeleteBeautify
ReplyDeleteWhat a pretty and awesome holiday piece! I love the spoons - they look beautiful - and the frame is lovely. I will never look at a wooden spoon the same again!
ReplyDeleteThis is amazing. You've outdone yourself. xi
ReplyDeleteWow Barbara this is just stunning! xx
ReplyDeleteAbsolutely beautiful!
ReplyDeleteAbsolutely beautiful!
ReplyDelete