Hello everyone! Barbara Rankin here. As you know, the Altered Pages design team are taking trips throughout the USA this month. The team has chosen two states to feature, and I chose California and Florida for my posts this month. My first post featured California, but today, I am going to go with the beachy theme, so Florida it is!

I am continuing to work in my metal covered mini album that I made a couple of months ago. I still have lots of blank pages to work in, and like I said before, Altered Pages is my go to store for dressing up my mini album pages.
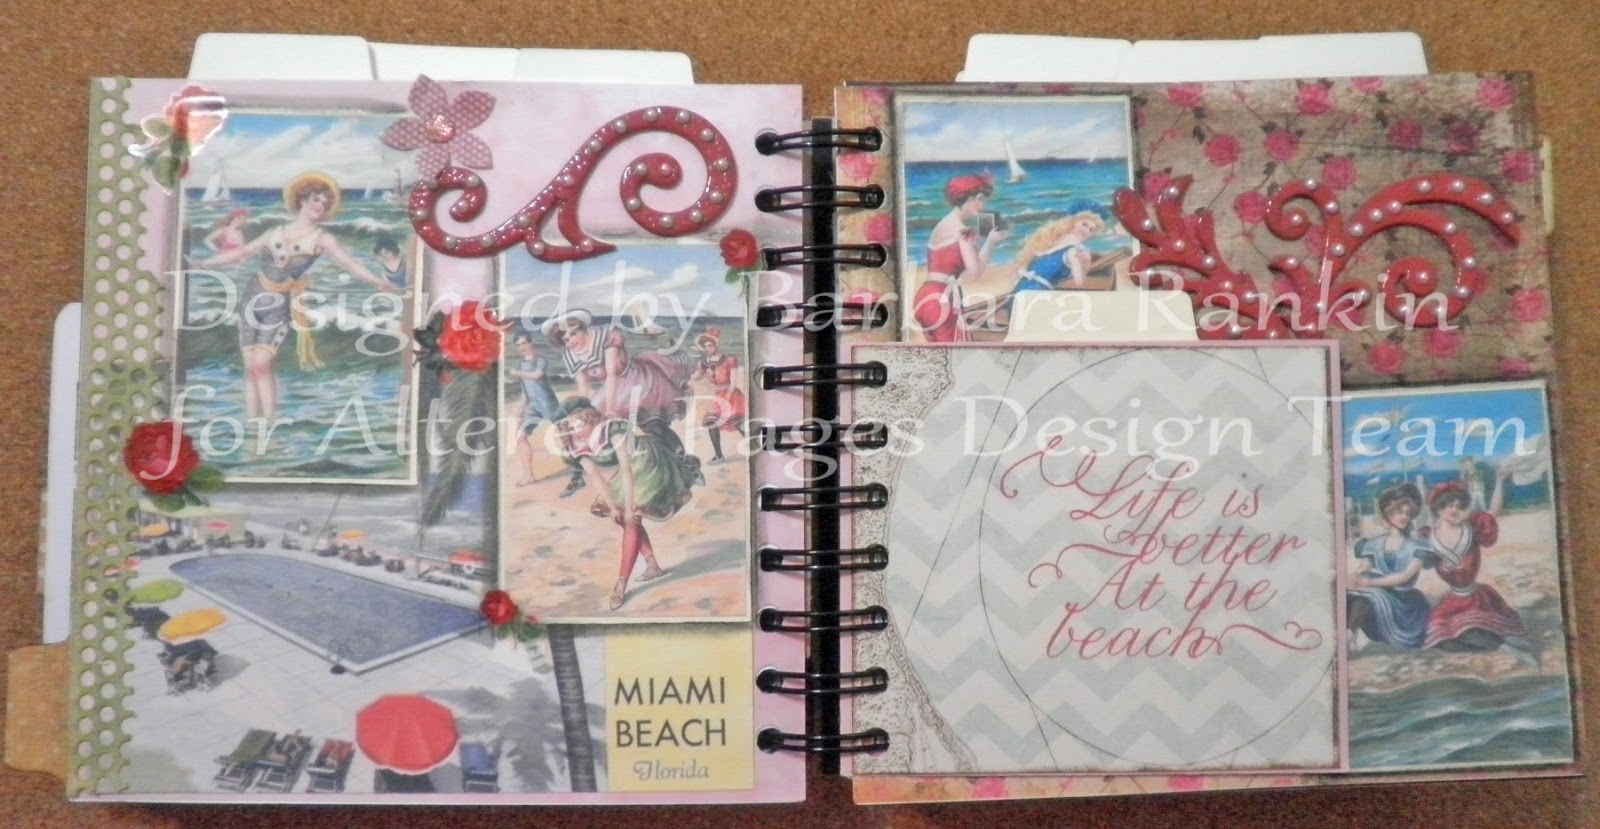
My first page spread: Background papers are from the Glitz Designs Pretty in Pink paper pad. I used the Brighton Beach and Vintage Vacations collage images, layered onto slightly larger cream card stock. I also used the "Miami Beach" image from the USA States Florida collage sheet.
 I inked two chipboard scroll corners with Memento Luxe Rhubarb Stalk and heat embossed with clear embossing powder, adding tiny pearl stickers. For filler, I added a few of the roses from the Valentine Stickers sheet, and a few flowers punched from scraps of the print paper.
I colored a torn strip of the wall joint tape with the Mossy Mixed Media Inx and adhered to the left side edge of the page.
I cut one-third of a pink A10 size envelope and punched binding holes in the side, so that the opening would be at the top to insert a cream card stock tag. I used the file tabs die cut for the top of the tag. I left the tag blank to add photos or journaling.
I cut a piece of paper from the Uncharted Waters paper to fit the front of the envelope, and used my Ranger Blending Tool to distress the edges of the paper with the Leather inx.
For a shadow effect and to make each collage image pop, I added charcoal pencil around the edges and smudged it with a Blending stump.
I fussy cut the whale from one of the print papers in the Uncharted Waters paper pad and adhered to the back of the envelope.
For my second page spread, I used background papers from the Glitz Designs Pretty in Pink paper pad. I lightly misted some pieces of cheesecloth with ink spray from my stash, then adhered to each page, as shown.

I layered the Brighton Beach collage images onto slightly larger cream card stock and adhered to page, as shown.
I adhered the banner from the Yours Truly What-Nots Embellishment Collection across the top of the page, as shown. I used foam dots to lift them off the page.
I used a coin envelope and punched a thumb notch in the top of it, then added one of the Brighton Beach collage images that I distressed with Leather Inx and Ranger Blending Tool.
I stamped "Look Out World" onto scrap cream card stock with brown ink and punched with a decorative label punch.
I used the Seashell Mold and Paperclay to make this selection of shells, sand dollars, etc. When dry, I painted each piece with Twinkling H20s and adhered onto and around my cheesecloth.
For the tag insert, I used a TREASURES Bingo Card and left the back blank to journal onto. I thought that whenever I go to the beach, I find all sorts of treasures, like these shells and such I have added.

Altered Pages Collage Sheets: USA States Florida; Vintage Vacations; Brighton Beach
Glitz Design Paper Pads: Pretty in Pink, Uncharted Waters; Sunshine in My Soul
Graphic 45 Come Away With Me Stamp set
Yours Truly What-Nots Embellishment Collection
scroll corners
Valentine Stickers
Coin Envelopes
Paperclay Packages
Seashell Mold
Bingo Card Packs
Ranger Blending Tool
Mixed Media Salazar Inx (Leather)(Mossy)
Memento Luxe Rhubarb Stalk
Blending stumps
adhesive dimensionals
Lightbulb safety pins
Cream card stock
Twinkling H20s (ColourArte)
Cheesecloth
Clear embossing powder
File Tabs die cut (Tim Holtz)
Self-adhesive paper wall joint tape
Charcoal pencil
I hope you enjoyed my project today, and that you can use some of these ideas for your scrapbook pages of your summer vacation, or a summer card for someone, or perhaps an art journal page with the same theme.
Thanks so much for stopping by, and have a wonderful and creative week!
Barbara

I am continuing to work in my metal covered mini album that I made a couple of months ago. I still have lots of blank pages to work in, and like I said before, Altered Pages is my go to store for dressing up my mini album pages.
My first page spread: Background papers are from the Glitz Designs Pretty in Pink paper pad. I used the Brighton Beach and Vintage Vacations collage images, layered onto slightly larger cream card stock. I also used the "Miami Beach" image from the USA States Florida collage sheet.
 |
| Left Side of Spread |
I cut a piece of paper from the Uncharted Waters paper to fit the front of the envelope, and used my Ranger Blending Tool to distress the edges of the paper with the Leather inx.
 |
| Right Side of Spread with Envelope shown |
 |
| Right Side of Spread without Envelope shown |
For a shadow effect and to make each collage image pop, I added charcoal pencil around the edges and smudged it with a Blending stump.
 |
| Front of envelope |
 |
| Back of envelope |

I layered the Brighton Beach collage images onto slightly larger cream card stock and adhered to page, as shown.
I adhered the banner from the Yours Truly What-Nots Embellishment Collection across the top of the page, as shown. I used foam dots to lift them off the page.
I used a coin envelope and punched a thumb notch in the top of it, then added one of the Brighton Beach collage images that I distressed with Leather Inx and Ranger Blending Tool.
 |
| Left Side of Spread |
I used the Seashell Mold and Paperclay to make this selection of shells, sand dollars, etc. When dry, I painted each piece with Twinkling H20s and adhered onto and around my cheesecloth.
For the tag insert, I used a TREASURES Bingo Card and left the back blank to journal onto. I thought that whenever I go to the beach, I find all sorts of treasures, like these shells and such I have added.

Supplies:
Altered Pages Collage Sheets: USA States Florida; Vintage Vacations; Brighton Beach
Glitz Design Paper Pads: Pretty in Pink, Uncharted Waters; Sunshine in My Soul
Graphic 45 Come Away With Me Stamp set
Yours Truly What-Nots Embellishment Collection
scroll corners
Valentine Stickers
Coin Envelopes
Paperclay Packages
Seashell Mold
Bingo Card Packs
Ranger Blending Tool
Mixed Media Salazar Inx (Leather)(Mossy)
Memento Luxe Rhubarb Stalk
Blending stumps
adhesive dimensionals
Lightbulb safety pins
Cream card stock
Twinkling H20s (ColourArte)
Cheesecloth
Clear embossing powder
File Tabs die cut (Tim Holtz)
Self-adhesive paper wall joint tape
Charcoal pencil
I hope you enjoyed my project today, and that you can use some of these ideas for your scrapbook pages of your summer vacation, or a summer card for someone, or perhaps an art journal page with the same theme.
Thanks so much for stopping by, and have a wonderful and creative week!
Barbara
Love your beachy layouts!
ReplyDeleteThese are all terrific little compositions! As you always do, you've inspired me to get to work!
ReplyDeleteloved it I am all about beach living in Florida!
ReplyDeleteBarbara, amazing as always! Your detailed work is so appreciated. The craftsmanship makes it hard to decide which page I like best, so I guess I adore them ALL!
ReplyDeleteLove the beach and this layout is awesome!
ReplyDeleteThis comment has been removed by the author.
ReplyDeleteSimply gorgous work Barbara!
ReplyDeleteYour projects are always so well thought out. You've used a lot of pieces and they blend together perfectly!! Great pages in your mini album
ReplyDelete