
Steph here and welcome to Altered Pocket Pages for the month of June!
Today's post is actually a WIP if you will, but no worries, the final project will be posted tomorrow. So, you will not too long to wait.
I will be showing you today the process of me gearing up for my pocket project. Make sure to check back tomorrow to see the final reveal!
This is a big old batch of fun right here. I have collage sheets, a gorgeous paper pack from Glitz in Vintage Blue, trims and ribbons, buttons, beads and well all kinds of good things!
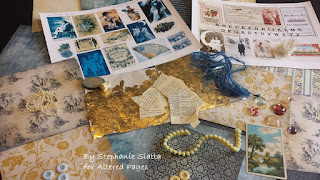

Here I am getting my collage images ready.

You can see I have started to cut my pattern paper into the appropriate size for the pockets. And, I have fussy cut my collage images.

And, here I am using up some of the left over scraps by using my round paper punches and scalloped paper punch.

One of the things I love about this Vintage Blue paper pack is it has a few patterns that will work in a more masculine way. So, I am setting up a couple of these with a man in mind. That is the case with the image below. My base is a very manly pinstripe pattern. It shows that I stamped a "T" thinking it could work as an addition to a masculine "Thank You" or "Thinking of You" card...or maybe a guy named Todd will need a greeting...hey you never know. I stamped the T on a scrap of vintage text paper and then adhered it down with matt medium.

Here is another version of that stamp on a more muted piece of patterned paper.

3. Or you can click the “events” under the banner to get to the event listings page, and click into the swap.
4. Once you are on the “events” page, you must click up in the upper right hand corner to join the swap.
5. Now you are registered and will be on the list for the swap….this is how you are allowed into the SWAP! At this point you can access the free collage selections for use in your pages.
6. The swap will be open on June 1 and sign ups accepted until June 20.
7. On June 21-- A listing of random partners will be created and posted on the event page June 22.
8. You have until June 30 to mail out your Pocket Letter to your partner.
9. PLEASE connect with your partner to get address information. You may want to decide what kind of Pocket Altered Pages theme/colors/ topic you wish to send to each other.
10. International Swappers are invited, however, postage costs will vary from country to country.
Today's post is actually a WIP if you will, but no worries, the final project will be posted tomorrow. So, you will not too long to wait.
I will be showing you today the process of me gearing up for my pocket project. Make sure to check back tomorrow to see the final reveal!
This is a big old batch of fun right here. I have collage sheets, a gorgeous paper pack from Glitz in Vintage Blue, trims and ribbons, buttons, beads and well all kinds of good things!


Here I am getting my collage images ready.

You can see I have started to cut my pattern paper into the appropriate size for the pockets. And, I have fussy cut my collage images.

And, here I am using up some of the left over scraps by using my round paper punches and scalloped paper punch.

One of the things I love about this Vintage Blue paper pack is it has a few patterns that will work in a more masculine way. So, I am setting up a couple of these with a man in mind. That is the case with the image below. My base is a very manly pinstripe pattern. It shows that I stamped a "T" thinking it could work as an addition to a masculine "Thank You" or "Thinking of You" card...or maybe a guy named Todd will need a greeting...hey you never know. I stamped the T on a scrap of vintage text paper and then adhered it down with matt medium.

Here is another version of that stamp on a more muted piece of patterned paper.

Okay, that is all for now. As I said above make sure to come back tomorrow to see my final Altered Pocket Page. I look forward to seeing you again. Thanks for stopping by.
Steph :-)
Here is a supply list of what I have used so far;
Also......
~~~~~~~~~~~~~~~~~~~~~~~~~
JOIN OUR SWAP
How to join the swap: How to join the AlteredPages.com Pocket Altered Pages swap!
1. Go to https://www.facebook.com/groups/AlteredPagesArtsociates/ On FACEBOOK
2. At top of the group page the “EVENT” will be pinned. You can access the SWAP via this link. ...3. Or you can click the “events” under the banner to get to the event listings page, and click into the swap.
4. Once you are on the “events” page, you must click up in the upper right hand corner to join the swap.
5. Now you are registered and will be on the list for the swap….this is how you are allowed into the SWAP! At this point you can access the free collage selections for use in your pages.
6. The swap will be open on June 1 and sign ups accepted until June 20.
7. On June 21-- A listing of random partners will be created and posted on the event page June 22.
8. You have until June 30 to mail out your Pocket Letter to your partner.
9. PLEASE connect with your partner to get address information. You may want to decide what kind of Pocket Altered Pages theme/colors/ topic you wish to send to each other.
10. International Swappers are invited, however, postage costs will vary from country to country.
Can't wait to see the finished project. This is actually one of our Pocket Altered Pages Kits "I got the blues". Thanks for sharing. p.s. love the text with stamp.
ReplyDeleteWow, so many choices available at Altered Pages. You have a perfect start to what will be, I am sure, a perfect finish. Cannot wait to see the final project!!!
ReplyDeleteGreat color choices, Steph! Looking forward to seeing it completed.
ReplyDelete