Hey there Altered Pages fans! This month, we continue our partnership with Jannette Lane, who started Pocket Letters™, and even though the deadline for the swap has passed, Altered Pages is still the best place to get all of your supplies for sending Pocket Letters™ to friends and family. So, the inspiration continues from the team for the remainder of the month.
This has got to be the simplest pocket page you could ever make.
I used the Klein Postcards and the Chirpy Goodness collage sheets, both of which are sized very closely to the size of an ATC, or pocket page. I simply cut the images apart and adhered them to the pre-cut cream ATCs, and added a few embellishments along the way.

Here's a fun little trick I figured out with these really cool Serviette Papers to make little "envelopes" for the tiny bits and pieces you may want to include in your pocket pages.
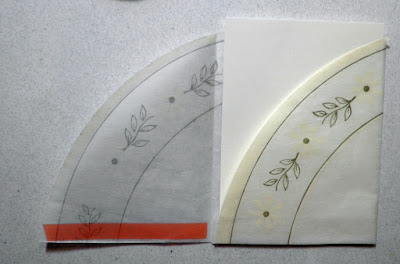
Using an pre-cut ATC for measuring where to make your folds. First, fold the serviette in half.

Place ATC in the center and at the top of the half circle, as shown below.
 Fold up bottom, approximately 1/2".

Fold right side in towards center.


Unfold the paper and cut serviette in half.
Cut away each of the outer edges along the fold line and to the center folds.
 Place red liner tape along bottom edges, as shown. One piece is on the flap and the other piece is on one of the sides.
 Fold center flap up and adhere both outer sides to that piece, forming a pocket.
 One side of pocket allows you a place to pull the tag out.
 This side can cover up most of the tag and be either the front or back, whichever way you choose.
 In this photo, I have removed my center tag from the center pocket, using words from the Spring Has Arrived Sayings collage sheet.

Altered Pages Supplies used, as well as some extra ideas to put inside your pages:
Collage Sheets: Klein Postcards, Chirpy Goodness, Spring Has Arrived Sayings
German Scrap (border)
German Scrap Butterflies and Birds
Bakers Twine Multi Colors
Serviette Papers
Washi Tape
Protector Pages for ATCs
Paper ATC Cardstock Packs (cream)
Ephemera Treasures
Kraft Paper Clocks
Light Bulb Safety Pins
I hope you have enjoyed our month long presentation, and enjoying ideas the design team has been sharing with you for these fun and addictive pocket pages.

There's still some time left this month for more fun with these, so keep watching as the team shares even more ideas, and be sure to visit the Altered Pages shop for all your pocket page supplies.
Thanks for stopping by, and have a very crafty week!!!
Barbara
This has got to be the simplest pocket page you could ever make.
I used the Klein Postcards and the Chirpy Goodness collage sheets, both of which are sized very closely to the size of an ATC, or pocket page. I simply cut the images apart and adhered them to the pre-cut cream ATCs, and added a few embellishments along the way.

Using an pre-cut ATC for measuring where to make your folds. First, fold the serviette in half.

Place ATC in the center and at the top of the half circle, as shown below.


Fold right side in towards center.

Fold left side in towards center. It's funny how these were just the right size when folded into thirds. Who knew?

Unfold the paper and cut serviette in half.
Cut away each of the outer edges along the fold line and to the center folds.


Altered Pages Supplies used, as well as some extra ideas to put inside your pages:
Collage Sheets: Klein Postcards, Chirpy Goodness, Spring Has Arrived Sayings
German Scrap (border)
German Scrap Butterflies and Birds
Bakers Twine Multi Colors
Serviette Papers
Washi Tape
Protector Pages for ATCs
Paper ATC Cardstock Packs (cream)
Ephemera Treasures
Kraft Paper Clocks
Light Bulb Safety Pins
I hope you have enjoyed our month long presentation, and enjoying ideas the design team has been sharing with you for these fun and addictive pocket pages.
Thanks for stopping by, and have a very crafty week!!!
Barbara
Barbara, beautiful page!! Love those floral and the tiny envelope is so sweet!!
ReplyDeleteGorgeous pocket letter! Also I have the paper that you used to create the envelope. I had never thought to use it that way. Thanks for the inspiration.
ReplyDeleteso very lovely and soft, nice work!
ReplyDeleteLove the flowers posted on the first full day of summer! Lovely!
ReplyDeletegorgeous and what a neat trick! xo
ReplyDeleteGreat idea! I like the pretty flowers.
ReplyDelete