We are lucky to be acquainted with Lisa Fulmer!

Lisa invited us to help share her new book and we are Tickled Pink to do so.
Lisa Fulmer is a well known craft industry professional and she will show you how to take control of your CRAFT STASH like a PRO! Lisa's book helps you maximize your storage, manage your materials and get the very most out of your Stash! To celebrate her new book we will give away a copy to one of our Blog commenters and it could be YOU! Comment on THIS blog post and add our Blog to your Facebook page by using the Facebook comment link below ~ random drawing Sept. 30, 2014
You can also visit Lisa at www.lisalizalou.com and make sure to order a signed copy of the book at www.craftyourstash.com
Our Design Team Artist, Stephanie Siatta shows you how to Craft your Stash:
Hi, Stephanie here and welcome to the Altered Pages Blog. I hope your having a wonderful Saturday!
You probably have heard the buzz lately about Lisa Fulmer's smash new hit, Craft Your Stash. It's a recently released amazing syllabus of everything you need to know about crafting with your craft "stash". There are organizational tips, tools and techniques as well as project tutorials.
Today, I will be sharing a recent project of mine where I created a large Asian joss paper canvas gathering supplies from my craft stash. This project will be up cycling a 1990's era painting where the foundation is an over sized (2 feet x 4 feet) canvas that had seriously seen better days.
Today, I will be sharing a recent project of mine where I created a large Asian joss paper canvas gathering supplies from my craft stash. This project will be up cycling a 1990's era painting where the foundation is an over sized (2 feet x 4 feet) canvas that had seriously seen better days.

Unfortunately, in my zest to create I forgot to snap a
before pic. The original painting was
very chic...in the 1990's. It was a roughly painted sketch of a woman,
beautifully done I might add. Now, here
is where the 90's comes in...to add some jazz (yes, I said jazz) to the piece a
shredded type of multi-color confetti/glitter was added randomly for texture and shine.
It worked at the time, but not so much anymore.
The picture below is after a coat of gesso and gray acrylic paint that
I had left over from another project. In
the picture below you can see the lumpiness of the surface from the glitter. The canvas had been stored and garaged for
many years and it showed its wear and tear just a bit. It literally was torn in places.
.jpg)

That texture right there is what I loved about it, well that
and it was FREE. The canvas was chipped
and torn, but no matter that was going to play perfectly into my design. To give this beauty new life I decided on a
soft, cool color palette that worked perfectly with the silver joss paper.


You can see the background colors developing. This was done with more of that same grey
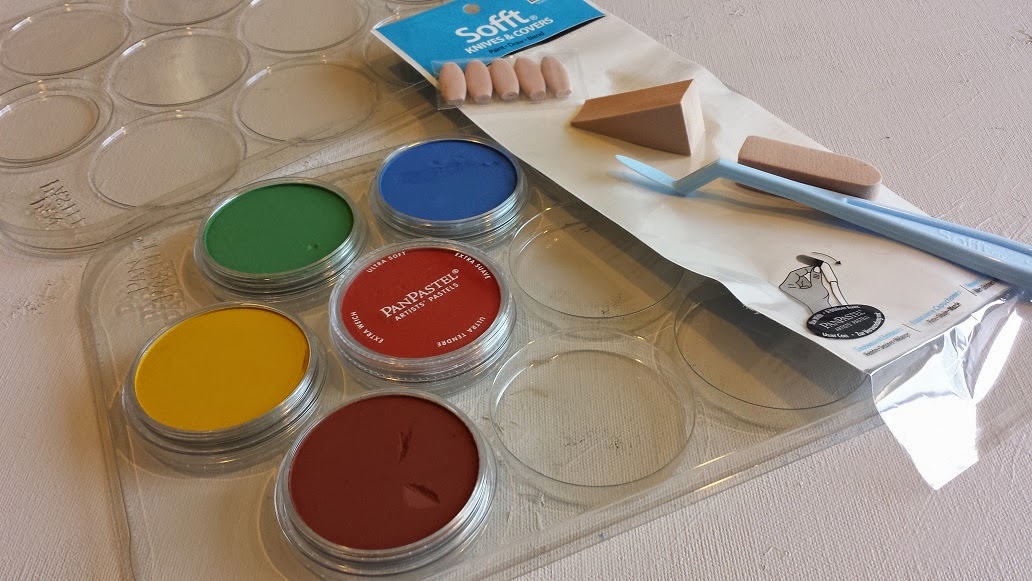
paint used earlier and a couple colors from my PanPastels. After the paint was dry I came in with light
touches of Ultramarine Blue, building the intensity gradually. I also used very
light touches of Red Iron Oxide to give it a slightly modeled look. Sadly, much of this will be covered, but I
know it's there and it does sneak through in some areas.

Next, it was time to dry fit my silver joss paper. I did not need this to be perfectly lined up,
nor did I want it to be. I wanted a
somewhat organic look to this. Oh, how I
love joss paper!!! It catches the light
so beautifully. The fibers and texture
of it are just wonderful.

Once I had the paper laid out I began adhering the tiles,
working in small sections. I did this by
brushing on Aleene's Tacky Glue directly onto the canvas. I had watered the tacky glue down just
slightly. I added a generous amount of
glue as I wanted it to saturate through the joss paper. I did this as you cannot brush over the top
of the joss paper. If you did treat this
as traditional decoupage the silver leafing would come right off and we don't
want that. So, once the papers were in
place I did not need to come back over the piece. Sweeeeeet!

My Asian joss paper canvas now has new life and a new home hanging in my in my formal living and dining room. I love this piece for so many reasons. 1. It was an upcycle, which I am always a fan of breathing new life into cast away art. 2. It was done using all supplies that I already had at my finger tips. I love projects where there is no need to pick up some special ingredient. 3. It is just plain old PRETTY!
My Asian joss paper canvas now has new life and a new home hanging in my in my formal living and dining room. I love this piece for so many reasons. 1. It was an upcycle, which I am always a fan of breathing new life into cast away art. 2. It was done using all supplies that I already had at my finger tips. I love projects where there is no need to pick up some special ingredient. 3. It is just plain old PRETTY!
I hope you enjoyed the tutorial.
Thank you Lisa and Altered Pages for the opportunity to be
part of something so wonderful! ~Stephanie
Supplies used;
Acrylic paint
Paint brushes
Large canvas
looks great come and see my blog post too
ReplyDeleteLove being able to up cycle and repurpose things I have around the house. Great jpb'
ReplyDeleteWonderful up cycle project, Steph. I never would have thought to make an entire art piece with Joss paper, but as you said, it is beautiful to look at and so elegant. TFS
ReplyDeleteI think you did a great just re-using this canvas. What a dramatic change! Great project!
ReplyDeleteGorgeous upcycling DIY - so smart! Thanks for being part of the the hop!!
ReplyDeleteBeautiful! I love recycled projects♥
ReplyDeleteGorgeous and easy and fun - how much better can you get! Love this project!
ReplyDeleteWhat a great project. I had never seen joss paper before and it looks so cool.
ReplyDeleteGreat way to repurpose your stash! Thank you for sharing :)
ReplyDeleteI love the new art! I know I don't have any joss papers in my stash but I'm going to explore using origami and washi paper in this style, miniaturizing for cards or journal covers. Mahalo for sharing.
ReplyDeleteThank you everyone for the inspiring & kind comments. :-)) Steph
ReplyDeleteI love this project...so inspiring!
ReplyDeleteLooks like a fun project!
ReplyDeletevery cool! looks like fun and a beautiful result. xo
ReplyDeleteLove the finished product!! Great colors and I really need to try the Joss papers. I have been hearing a lot about them but never tried them!!! Putting them on my wish list now! Thanks for sharing your upcycled creation!
ReplyDeleteWhat a great idea. Recycle old art and use something so cool. Love Joss papers.
ReplyDeleteLove it! Looks so modern.
ReplyDeletei saw a few old wall hangings at the thrift shop I think i will get them and re do them,thanks for the inspiration.
ReplyDeleteGreat idea for an old painting. Definitely inspiring, thank you for sharing =D
ReplyDeleteVery cool idea - love how you did this and shared the process! Bye Bye 1990's!!!
ReplyDeleteThis is a gorgeous idea to decorate your home Steph! xx
ReplyDeleteThat was totally different. Like what you created
ReplyDelete