Hello everyone, and welcome back to the second half of our monthly partnership with Sin City Stamps. For the remainder of the month, both design teams will be creating Halloween themed projects using products from both Sin City Stamps and Altered Pages. So if you love Halloween, like I do, you won't want to miss all the inspiration from both design teams.
For my project today, I went a little crazy. I decided to make a mini album out of this cool chipboard shrine from Sin City Stamps.
Here are a few pictures of my finished book, front and back.
I took a gazillion photos and because it is a book, there were lots of directions. So I decided to, hopefully, make it easier for you to read by using Snapguide. I hope you enjoy my tutorial and pictures of each page.
Supplies Used:
Altered Pages: AP-288 Happy Halloween collage sheet; AP-2084 Screaming Skulls; AP-1080 Antique Halloween; AP-1820 Quoth the Raven, Nevermore; AP-562 The Other Side of Halloween; G45 Steampunk Spells paper; Scor-Tape; Aleene's Tacky Glue; 1" Raven Black Flowers; Stickles glitter glue; Gilder's Paste (Foundry Bronze); Memento Black ink pad; Skull ribbons
Sin City Stamps: Shrine Chipboard Frame 2; Urban Grunge stamp set; Halloween Bingo stamp set; Halloween Takes Flight stamp set;
Other: Tyvek scraps; black acrylic paint; Black Soot distress glitter; clear distress crackle paint; grunge board; Black Soot, Peeled Paint, Seedless Preserves, Dried Marigold distress inks; 3D Crystal Lacquer; spider web craft punch;
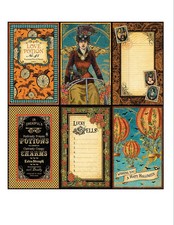
Check out this special deal on the Graphic 45 Steampunk Spells paper I used for my book!
Order one of these special deals with Graphic 45 Steampunk Spells items. You will receive one 8x8 paper pad, one 6x6 coordinating paper pad and 6 oversize postcards. Separately it would cost 25.00 but for our special spooky friends - sale price of $19.50!! limited quantity!
For Halloween and Fall fun
Tins, doo-dad jars, pipettes, specimen jars, pen nibs, postcards,resin flowers, spooky die cuts, glass dropper bottles, foil sheets,paper mache and lots more stuff for your stash. Make your ART fun and different!
LOTS OF DIFFERENT FUN HERE!
For my project today, I went a little crazy. I decided to make a mini album out of this cool chipboard shrine from Sin City Stamps.
Here are a few pictures of my finished book, front and back.
I took a gazillion photos and because it is a book, there were lots of directions. So I decided to, hopefully, make it easier for you to read by using Snapguide. I hope you enjoy my tutorial and pictures of each page.
Supplies Used:
Altered Pages: AP-288 Happy Halloween collage sheet; AP-2084 Screaming Skulls; AP-1080 Antique Halloween; AP-1820 Quoth the Raven, Nevermore; AP-562 The Other Side of Halloween; G45 Steampunk Spells paper; Scor-Tape; Aleene's Tacky Glue; 1" Raven Black Flowers; Stickles glitter glue; Gilder's Paste (Foundry Bronze); Memento Black ink pad; Skull ribbons
Sin City Stamps: Shrine Chipboard Frame 2; Urban Grunge stamp set; Halloween Bingo stamp set; Halloween Takes Flight stamp set;
Other: Tyvek scraps; black acrylic paint; Black Soot distress glitter; clear distress crackle paint; grunge board; Black Soot, Peeled Paint, Seedless Preserves, Dried Marigold distress inks; 3D Crystal Lacquer; spider web craft punch;
Check out this special deal on the Graphic 45 Steampunk Spells paper I used for my book!
Order one of these special deals with Graphic 45 Steampunk Spells items. You will receive one 8x8 paper pad, one 6x6 coordinating paper pad and 6 oversize postcards. Separately it would cost 25.00 but for our special spooky friends - sale price of $19.50!! limited quantity!
For Halloween and Fall fun
MORE STUFF YOU GOTTA HAVE!
Things for you to order TODAY! Tins, doo-dad jars, pipettes, specimen jars, pen nibs, postcards,resin flowers, spooky die cuts, glass dropper bottles, foil sheets,paper mache and lots more stuff for your stash. Make your ART fun and different!
LOTS OF DIFFERENT FUN HERE!


just terrific ... you've inspired me to get out the creepy crawly witchy stuff and start Hallowe'ening things up around here! Lovely piece, Barbara - love all the details you've either added to or enhanced on the G-45 designs
ReplyDeleteBarbara, you are amazing! This shrine book is awesome!!
ReplyDeleteAs always simply stunning Barbara! All the little details are incredible!!!
ReplyDeleteVery well done Barbara! Great tutorial too!
ReplyDeleteWicked Cool Barbara! Love it :)
ReplyDeleteThis is amazing Barbara! I love it!!!!!
ReplyDeleteThat is an incredible book! I love it.
ReplyDelete