
Happy Friday, my crafty friends! Today I have a tag project to share with you
showcasing both Altered
Pages and Leaky Shed
items. The two companies are partnering
in July to bring you some fun and exciting projects. My project uses two Altered Pages collage sheets, ephemera
and art supplies and this wonderful Leaky
Shed chipboard balloon.


Begin by finding a piece
of mica large enough to fit inside the balloon
shape. Place the balloon face down
on the sheet of mica and trace around the outside edge of the balloon with your
craft knife.
You can decide later if you
want to separate the sheets of rock or leave it whole. Separating them will make for a lighter color
rock and is a good idea if you really want the background to show through. Set the mica aside.
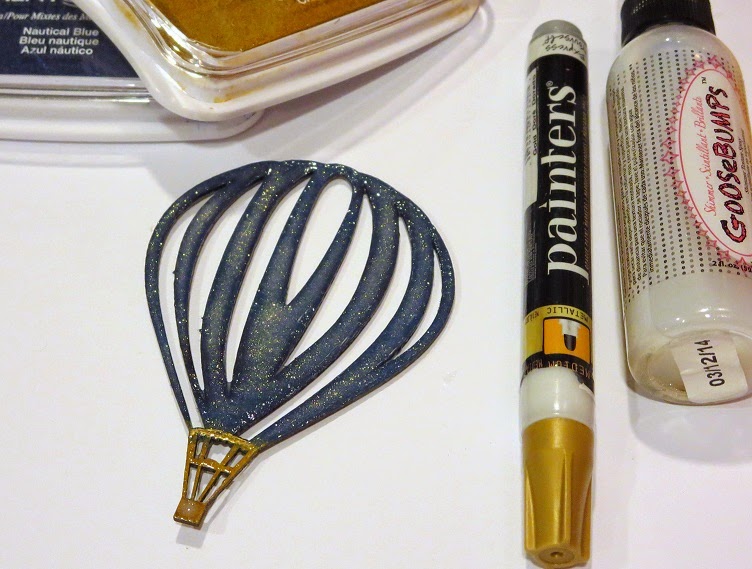
Apply the ink
to the balloon directly from the pad. If
you are using pigment ink, you may want to either heat set or heat emboss. I used a different color for the basket part
of the balloon before embossing. I
really wanted a shine on it so I sprayed an even coating of clear texture spray
over the entire piece and let it dry.
After that, I adhered the mica to the backside and used a gold paint
marker to add some detail to the basket of the balloon.
To create the tag itself, I used the middle image on the Fly
With Steam collage sheet. I didn’t
want to have the balloon in the image get lost behind the chipboard so I cut
the collage piece in three sections and pieced the words together for the
background. I fussy cut the balloon and
glued it to the bottom corner.
Ink was sponged around the outside of the tag and around the
balloon. Strips of German
scrap border were attached on three sides.
I used a ticket stamp from my stash for another collage element. Once
those pieces were together I sprayed the tag with bronze colored texture
spray. I also sprayed a flower I found
in my ribbon drawer.
The word “BALLOONS” is from the Steampunked
Machines collage sheet and has a touch of the same ink on it as the tag. The blue ink from the balloon was added to
the torn edges. A few Dew
Drops and some fibers from my embellishment collection finishes it off. And as the Fifth Dimension sings, “Up, up and
away in my beautiful, my beautiful balloon!
See you next time!! If you're looking for more fun and inspiration, be sure to check out both the Altered Pages and Leaky Shed Studio blogs. And while you're at it, check out Robin's Birdhouse, too!!
Love all the little details in your tag you created!!! Wonderfully done!!! <3
ReplyDeleteI love vintage + balloons, wonderful tag!
ReplyDeletelove the mica idea behind - leads me to think of other dies this could be used with just as effectively. Thanks for sharing such detailed directions for a lovely tag
ReplyDeleteFabulous, Robin. Love the tag, the balloon, and all it's glory!!
ReplyDeleteGreat tag, Robin!
ReplyDelete:)
the mica IS A PERFECT accent. Great project.
ReplyDeleteLove your beautiful tag.
ReplyDeleteLove this use of mica. looks brilliant
ReplyDeleteThe tags is so inspiring! I love the hot air balloons♥
ReplyDeleteFun tag Robin ~ LOVE the mica! One of my favorite embellishments to use on anything :)
ReplyDeleteTFS!
This comment has been removed by the author.
ReplyDeleteWhat a gorgeous tag! I love it! TFS! :)
ReplyDeleteAwesome way to use mica! Your tag is absolutely fantastic!
ReplyDeleteGreat job I love this piece
ReplyDeleteBeautiful Tag Robin, I love the shimmery balloon.
ReplyDeleteLove that balloon!
ReplyDelete