Wooo Hooo!!!
Happy Halloween!!!!
Well, if you've stuck with it you'll know this is the culmination of the Smeared & Smudged 31 Days of Halloween. We've had an entire month full of spooks, haunts and scary goodness and to finish it off I'd like to share my
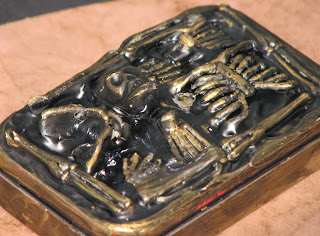
Box of Bones
But it doesn't really have bones in it...
Just a whole lot of corny Halloween joke cards!
Initially I sanded the candy tin then covered it with a layer of black ink.
I sanded a bit more so some of the red/gold would show through.
I then set about adding gobs of gesso to the lid ~ next I pushed in "bits" of a plastic skeleton I had previously cut apart submerging the pieces about half way. I let the gesso dry overnight.
The next day I painted the gesso and bones with another layer of black acrylic paint. Once that layer had dried I rubbed a bit of metallic acrylic paint over the bones to really make them pop. I also applied a bit of the metallic paint on the sides as well.
I set about decorating the inside of the box using Graphic 45's Steampunk Spells papers and rubber stamps as well as several Halloween collage images.
On the back of each card is a corny Halloween joke from the list on my blog...
It would make a perfect gift idea for all the little ghouls and bats haunting your house this holiday season.
We all hope you've had a wonderful time
and
enjoyed all of the Halloween projects brought to you buy everyone here at Altered Pages!!
Happy Halloween!!!


Super spooky tin and fabulous cards inside. what a fun project! Happy Halloween! xxD
ReplyDeleteHappy Halloween!!! What a fabulous project to end with! love the little tin and the fabulous steampunk spell cards inside! Will get a look at your corny jokes later! lol Thanks for all the inspiration this month! mo x
ReplyDeleteThis is awesome!!
ReplyDeleteHappy Halloween!
ReplyDeleteThank you for all you have shared this month, and all your time and effort.
What a fun project to end with. The tin is a great item to have sitting on a desk and the cards inside are beautiful. I look forward to reading corny jokes and sharing them with friends. Thank you.
I had a great time this month and learned a lot.
Happy Halloween. Thank you for every project you have shared this month, and for being a sponsor. I truly appreciate it.
ReplyDeleteThis is a great project to end this month long extravaganza with. I love it. I am going to have to check out the joke blog. My daughter loves corny jokes.
Sad to see the last one for this HOP, but we will do more and have fun challenges coming too!
ReplyDeleteRoni this one is a GRAND FINALE!
Awesome altered tin. Love all the skellie parts and pieces. Great tags inside. It has been fun hopping to your site and getting an eye full of artistic candy. Happy Halloween to everyone who played this past 31 days!
ReplyDeleteOh my gosh this is awesome! I love your body parts tin and how fun that you have silly jokes to keep inside. It's been a blast visiting your blog this month! Happy Halloween!
ReplyDeleteHAPPY HALLOWEEN to you all!!!! SPOOKTACULAR altered tin Roni, I LOVE IT!
ReplyDeleteHow cute is this...spooky cute that is...and what a great little gift it would make! Thanks for such amazing creations all month long!
ReplyDeleteLOVE THIS! How awesome! Great job with the touch of metallic! Loved seeing all your wonderful goodies this month!
ReplyDeleteThis is an awesome finishing post!!! The tin cover is fantastic... and all the ATCs are wonderful... HAPPY HALLOWEEN!!!
ReplyDeleteFab project. Love the ATC's. Thanks to the DT for a fantastic month of gloriousness. Well done to all
ReplyDeleteAbsolutely wonderful piece of art. Love how you added the bones to the lid, and the cards inside are just fabulous! Sorry to see it over. So many masterpieces. This one is tops!
ReplyDeleteRoni this is so cool! I love it! Thanks for the info on how you made it!!!
ReplyDelete