
Today I wanted to share with you an image that I "altered" using various techniques. It all started with this dancing gypsy I found on the Altered Pages Altered Bits II collage sheet. I just love her! With my photo editing software I cropped and enlarged her. Then I went ahead and did some more editing by inverting the colors, i.e. making her black and the background white. Of course a simpler way would be to enlarge her with copy/printer and cut her out directly, then paste her shape onto black card stock and cut her out again which will give you a nice silhouette. Well, once you have her silhouette or template for that matter, you can make a stencil or a mask for inking, painting or printing! What was really fun for me was using the software from my digital cutter to cut her out.
The simple silhouette shape can then be scanned into the computer ( placed on a white paper) and easily converted into a jpeg, svg, png, psd, etc., making her into whatever color, size or shape that you want her to be. Are you seeing the potential here?!? So next time you see an interesting shape in one of the collage sheets purchased from Altered Pages think beyond cutting and pasting as is and try something new!
 I've enlarged the image, printed then cut it out


The simple silhouette shape can then be scanned into the computer ( placed on a white paper) and easily converted into a jpeg, svg, png, psd, etc., making her into whatever color, size or shape that you want her to be. Are you seeing the potential here?!? So next time you see an interesting shape in one of the collage sheets purchased from Altered Pages think beyond cutting and pasting as is and try something new!


Then I glued the shape onto black card stock and cut it out again. Since I have a digital cutter, I was able to directly cut the shape out directly which is why it looks so perfect.

I went ahead and cut her out of white stencil paper to use as a mask.

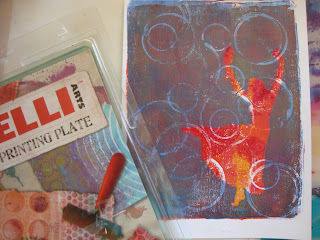
Here she is masked and overprinted in blue showing the orange yellow red print beneath.

This is a ghost print which happens after pulling a first print, taking off the mask, then laying down a second sheet of paper which reveals a crisp outline of the mask. This was overprinted in a red purple. Sometimes this works and sometimes it doesn't. I kind of like this one. Will see.

Maya Mist spray ink patina green was sprayed on using a stencil. The ink kind of pooled and made her edges fuzzy looking. I think the ink reacted with the paint below causing the ink to be resisted somewhat by the paint. Not sure where I want to go with this yet. May go back over it with some different colored ink and add some more textures to the background.
Well I've just barely scratched the surface here and will be playing with this some more!
Disclaimer: Always give the original source credit or if you're
not sure ask for permission. Never ever sell the altered piece/design as
your own original design unless it is copyright free.
This comment has been removed by the author.
ReplyDeleteThis comment has been removed by the author.
ReplyDeleteINGIRD IS AN AMAZING TECHNIQUE ARTIST! She plays with colors and textures and methods with fabulous results. THANKS FOR SHARING!
ReplyDeleteIngrid your technique is wonderful , thanks for the post! I have not had a chance to even "play" with my Gelli plate yet ! :)
ReplyDeleteEunice