
Hi all!
Becky here today to share a little tutorial on how to make your own background paper with 3 completely unrelated supplies: A paint brush, a *catalog or magazine {*more on that in a minute} & a bottle of CitraSolv Concentrated Cleaner! If you read my last post, I am using some of these hand-crafted papers in my next kit for AP. Today, I will show you how to make your own!

First, you will need a good WELL VENTILATED, plastic-covered working space - THIS STUFF IS SMELLY & the process is messy!! I like to work with it outside & would have done a video for this if I could block out the highway noise! LOL!
Then you'll need a bottle of this silly-expensive concentrated natural cleaner - I think I paid $7 for an 8oz bottle at Vitamin Cottage! You can only get this at natural grocers, like Vitamin Cottage & Whole Foods, but some online art supply stores carry it too. The prices are about the same no matter where you go! AND, no other citrus-type cleaner seems to work - I did my research before I went shopping!!
Next, you need a catalog {or magazine - the next paragraph} that is printed with ink that smears! I found that an Eddie Bauer catalog worked well & the colors are bright & vibrant inside!

Most mixed media artists that use this technique find that the National Geographic magazines work REALLY well & you get stunning results {See the last magazine photo later in this post} & you can usually find old issues at the Goodwill. Since I didn't have one, I used the catalog. One note about using the magazine, you will need to go through & tear out any of the pages that have TONS of text or a lot of BLACK before you start. Also, remove those silly subscription cards & any other thick paper inside. {Do the same if your catalog has a lot of text, but mine was pretty good, so I didn't have to.}

Next, pour some of the CitraSolv into a container, then take a soft bristle or a foam brush & brush the liquid liberally onto pages; turning to coat backside too as you go along. I started in the middle, but you can start anywhere after the first & last pages, just be sure to coat the pages well.
You will notice the ink smearing on the pages as you brush, which is what you want it to do! You don't want the ink to pool up, but you also want the pages to dry together because you didn't use enough. {Some artists put a thin layer of tissue paper between the pages to absorb the black ink, but I tried this & didn't get very good results - except for some cool tissue!} Once all the pages are coated front & back sides, close the magazine/catalog on itself & let "steep" for 1-3 hours.

Once the solvent has steeped through the pages, it's time to carefully peel them apart & set aside to dry...I like to set them outside in the sun so they dry faster!


Even though you can still see some of the catalog image, the end result is a fun, muddled color to play with on your mixed media projects! You can even go through with a permanent pen & outline whatever image you see on the page for added interest!

These are some of the pages from a National Geographic magazine - totally different look, right?! The pages were thicker than the catalog & take the solvent differently. Some of the images didn't go away entirely & I was left with weird ghosts on the pages {like little yellow climbers going up Mt. Everest or a piece of the Titanic showing!} They will still be fun to play with!
Now...what to do with these pages when they're dry?
Well, add an Altered Pages image of course!!!
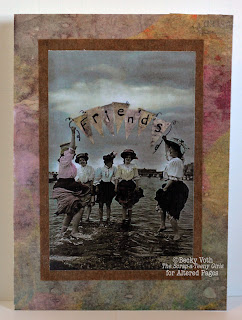 I used one piece of the solvent paper for the background of this 5x7 card & then cut pieces of it for the banner the women are holding.
I love the dreamy quality of the paper made with the solvent. I can't wait to experiment some more!

Inside is this sentiment:
There's nothing worth the wear of winning,
but the laughter & love of friends.
- Hillaire Belloc
(The image is from the "At the Beach" collage sheet - I digitally cut & enlarged the image I wanted in PSE first.)
Thanks for stopping by today!
Hope you are enjoying these last few days of Spring!
Cheers!

Well, add an Altered Pages image of course!!!

I love the dreamy quality of the paper made with the solvent. I can't wait to experiment some more!

Inside is this sentiment:
There's nothing worth the wear of winning,
but the laughter & love of friends.
- Hillaire Belloc
(The image is from the "At the Beach" collage sheet - I digitally cut & enlarged the image I wanted in PSE first.)
Thanks for stopping by today!
Hope you are enjoying these last few days of Spring!
Cheers!

You inspired me to give it a try ! I have a bottle sitting on my shelf I purchased awhile ago , now I need to get busy !!Great project !
ReplyDeleteEunice
It's a really cool process! I am going to buy a larger bottle & try spraying it onto a couple pages & see what happens!!! If you go to the Citrasolv site, they have an artists page with tips too! Have fun & don't inhale too much!! :)
DeleteSo cool. My Whole Foods is way across town but I may to make the trip for it. :))
ReplyDeleteCathy,
DeleteI went to 4 stores before I found it! I was just being lazy & didn't want to drive the extra miles to the Vitamin Cottage, so I checked EVERY other store around me! Crazy! Hope you have fun!
Awesome tutorial, THANKS for sharing it.
ReplyDelete