
Let it Snow

I want the thank The Crafters Workshop for the amazing stencils they are sharing with the Altered Pages Design Team this month.  There are so many ways to use stencils!!!  This month we hope to inspire you to use stencils in your art!

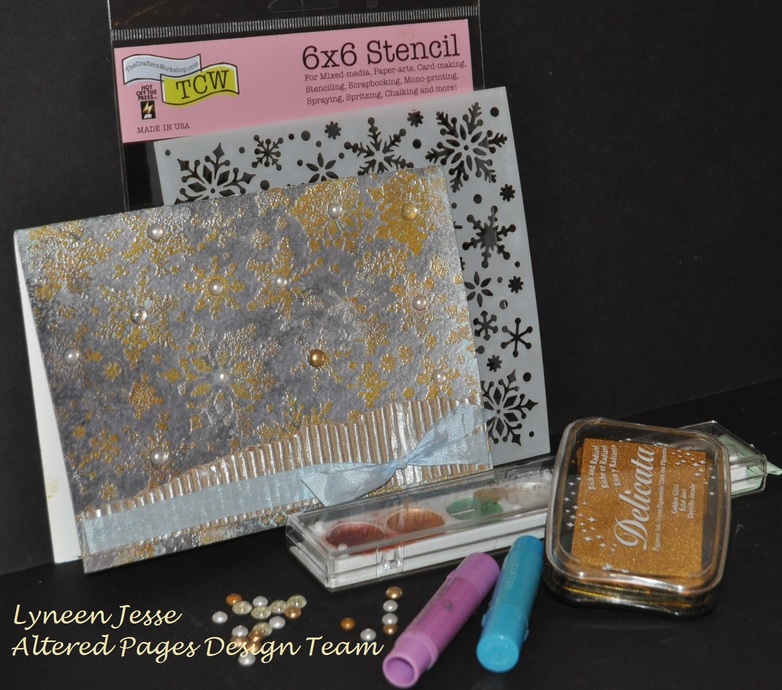
Today I created my card using The Crafters Workshop Snowflake stencil.


I don't know about you, but when I am creating some of my projects take on a life of their own.  When I started this card my vision was so far off what I created, but I am really happy with the end result. 


Supplies:
The Crafters Workshop Stencil - Snowflake
Gelatos - Blue and Purple
Watercolor paper
Waterbrush
Delicata Ink - Gold
Wax rub
Embossing Powder Gold
Corrugated Cardboard
Dew Drops
Tacky Glue
Double-sided tape
Ribbon


On watercolor paper create a background with Gelatos - Blue and Purple.  Start by spritzing the paper with water,  then on a craft mat create watercolors with the Gelatos by scribbling the Gelato on the mat and mixing with water.  Then let dry. 

 
When the Gelatos are dry use  The Crafters Workshop Snowflake Stencil and ink over the background. 

 
I pressed the ink pad over the stencil.  Then with gold Embossing Powder heat emboss the snowflakes.

 
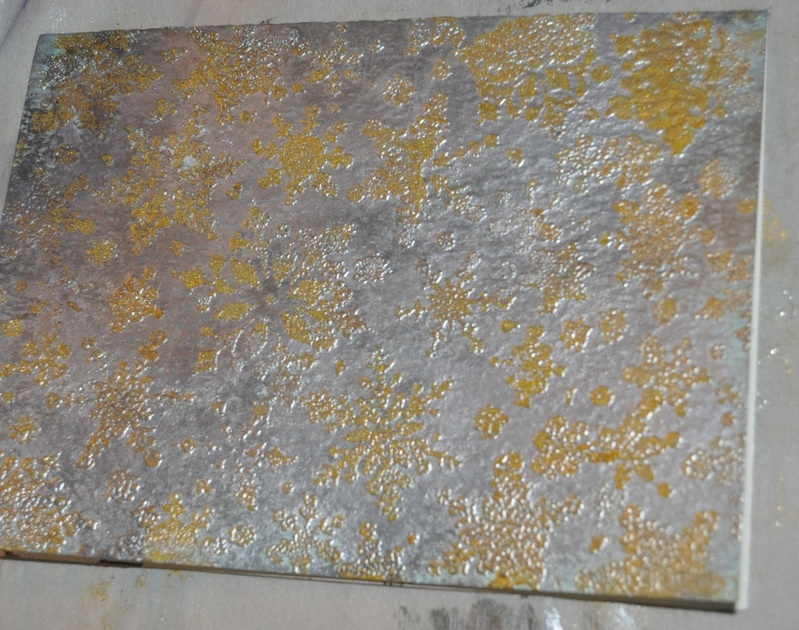
Use Wax Rub over the gold embossed snowflakes, the snowflakes resisted the rub.  With a paper towel remove excess rub.

 
Tear a piece of Corrugated Cardboard the width of the card.  On the ridges apply the Wax Rub

 
Add ribbon on top of the Corrugated Cardboard, attach to the card with Double-sided tape.

 
Use Tacky Glue to adhere Dew Drops to the center of random snowflakes!

 
Hope this inspires you to play with stencils!


Comments

Popular posts from this blog

Get on Over!

We like having you visit,  Make sure to subscribe... Just click here - easy peasy November will be filled with Die Cut ART,  join us. Embellish premade pieces art by Barbara Rankin Cut your own pieces Paint or Foil to add interest art by Lyneen Jesse Combine Die cuts in a variety of mediums art by Jean Moore Create with your manual die cutting machine  or buy premade
 Handy Tip for Artists, Recyclers and Neat Freaks! I have a follow-up to the Citra-Sol method for creating fabulous background pages and collages.   I bought a big bag of navel oranges and realized I had the ingredients to make my own solvent!   Simply take a clean glass jar, peel the rind from the oranges and place all the rind/peels, without the pulp (tangerines, oranges, navels) into the jar.   Pour enough vinegar over the peels to cover them.    Allow the jar to sit for a week or two and VOILA!     You have made your own solvent for literally pennies.    You will notice the liquid getting a bit thicker than the plain vinegar and it does not smell bad!!! I now have a  HUGE jar on the window sill!       Be careful and only use this after testing on a safe spot.

DINA WAKLEY Featured Artist

We are SO Proud to present Dina Wakley with her ART and February Tip   (oops, she says she is totally disorganized, so there is HOPE for all of us!) Dina Wakley is a mixed-media artist and teacher. She loves everything about art: creating it, thinking about it, looking at it, and teaching it. Dina is passionate about teaching art. She teaches both in-person and online workshops.  She is a docent at the Phoenix Art Museum, where she gives tours to school groups and gets kids excited about art. As a Ranger Signature Designer, Dina designs a line of mixed-media art supplies that includes acrylic paints, mediums, brushes, rubber stamps, stencils, and more. Look for the Dina Wakley Media Line by Ranger at a store near you.  Dina's books Art Journal Freedom and Art Journal Courage are available now. Also look for three new North Light DVDs starring Dina, available this month: "Art Journal Mark Making and Throwing Ink," Art Journal Color Courage," and &q