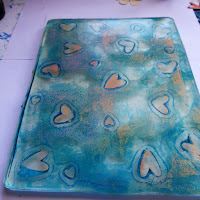
I am often inspired by nature and my play this week turned to playing with punched out shapes, hearts, butterflies and flowers and using them for masks on my Gel Press Plate. I am filling a void as we head towards winter here in Australia. I miss seeing all the flowers in bloom and lots of butterflies fluttering in the garden. So I thought I would bring these things to life with paint today with a little love thrown in too.
I usually begin with a base layer of paint for these kind of prints. For my heart play it was pink.
From this initial layer I take a full print and ghost print adding any left over paint on the brayer to the plate for my ghost prints.
My second layer is a complimentary or contrasting color applied to the plate and to which I then stick down my punched shapes to take a print. The mask created by the punched shapes leaves a void and allows the earlier layers to show through. My second layer choice for my heart play today was Orange. You can see this print below.
Once I have taken a few prints in this way I then cover the entire plate still with the punched shapes on it with a layer of fresh paint. Today over the hearts I chose to work with Blue Splash Ink, and took a print, you may find at this point there has been so much paint on your punched shapes that they may decide to stick to your print and this is kind of cool as they bring back into your print the original color you had added to the layer when you first stuck them down..
It is usually around this point that I really love the prints being achieved, and there is still paint and color left on the plate so I peel off the punched shapes which reveals color and outlines of the shapes. I add a layer of paint yet again and take further prints. With some paint still left on the plate for a ghost print I decide to add some further detail by pressing my circle background stamp into the plate.
My favourite print of my heart play was this final print once the punched hearts were removed.
For my flower prints I followed a similar process however I used more than one color roughly blended for my first layer of color and because I added my punched shapes straight away I was left with white space.
This void I then decided to fill but how?
I used a spray ink (remembering you can pretty much use any type of water soluble pigment on the plate). I chose to spray the ink over where the flowers still stuck down on the plate were and took a new print, then after removing the flowers I added spray ink again and added this as a second layer to my first prints with the white void.
It was at this point that my camera died so I can't share the pics of the process but I then decided with outlines still showing on the plate to add color into the petals simply by adding pink paint to my finger and pressing this into the outline of the petals and taking a print.
I played again in a similar fashion with my butterfly punched shapes.
Here's a look at some of the prints from my play.
.
I usually begin with a base layer of paint for these kind of prints. For my heart play it was pink.
From this initial layer I take a full print and ghost print adding any left over paint on the brayer to the plate for my ghost prints.
My second layer is a complimentary or contrasting color applied to the plate and to which I then stick down my punched shapes to take a print. The mask created by the punched shapes leaves a void and allows the earlier layers to show through. My second layer choice for my heart play today was Orange. You can see this print below.
It is usually around this point that I really love the prints being achieved, and there is still paint and color left on the plate so I peel off the punched shapes which reveals color and outlines of the shapes. I add a layer of paint yet again and take further prints. With some paint still left on the plate for a ghost print I decide to add some further detail by pressing my circle background stamp into the plate.
My favourite print of my heart play was this final print once the punched hearts were removed.
For my flower prints I followed a similar process however I used more than one color roughly blended for my first layer of color and because I added my punched shapes straight away I was left with white space.
This void I then decided to fill but how?
I used a spray ink (remembering you can pretty much use any type of water soluble pigment on the plate). I chose to spray the ink over where the flowers still stuck down on the plate were and took a new print, then after removing the flowers I added spray ink again and added this as a second layer to my first prints with the white void.
It was at this point that my camera died so I can't share the pics of the process but I then decided with outlines still showing on the plate to add color into the petals simply by adding pink paint to my finger and pressing this into the outline of the petals and taking a print.
I played again in a similar fashion with my butterfly punched shapes.
Here's a look at some of the prints from my play.
.


Comments
Post a Comment