
If your family is like mine, they get together for family dinners to celebrate holidays and birthdays. Table décor is a fun way to help make the day special. Today I have a wooden centerpiece that would be great to sit at the dining table or on a mantle or shelf.

I have a few of these wonderful square wood blocks just waiting around for the perfect project. I grabbed some orange paint and coated both the block and glass slide holder with a bright orange acrylic paint. I didn't gesso the block first because I wanted the wood grain to show through the paint.


 SUPPLIES USED:
SABOR Papel
3" Wooden Block
Ephemera Treasures pack
Assorted Game Pieces pack
Sabor AMOR cut-outs
Eco Board double glass slide holder
Tacky Glue
Crystal Lacquer
Stickles glitter glue
Wink of Stella glitter brush
Glue stick


I have a few of these wonderful square wood blocks just waiting around for the perfect project. I grabbed some orange paint and coated both the block and glass slide holder with a bright orange acrylic paint. I didn't gesso the block first because I wanted the wood grain to show through the paint.

This beautiful purple ribbon was in one of the ephemera treasure packs and it goes with the SABOR designs perfectly. A little tacky glue holds it in place on the wooden block.

The candles on this piece of SABOR paper were painted with Crystal Lacquer to give them shine and dimension. A small amount of Stickles glitter glue is in the center of each flame.

One of the older Mailbox Muse kits has an Old West theme. This wooden star was part of that kit. The star was painted with purple acrylic paint. I found two of the white candles in the SABOR Amor cut out set and colored them with permanent markers so that they would match the scrapbook paper. Again, the centers have Stickles glitter glue in the flame center.

When dry, the wooden star was attached with Tacky Glue.

The same purple paint was used inside the slide holder.

And also on the Jenga tiles that came in an assorted game piece kit.

I found some little wooden people in a drawer and painted them to match the SABOR papers. Scraps of their confetti design decorate the Jenga tile legs.

The Jenga legs were attached with more Tacky Glue.

More Tacky Glue was used to hold on a few Dew Drops to give the star a little bit of shine.
Each of the four sides feature a different SABOR design from the scrapbook papers and Amor cut outs.


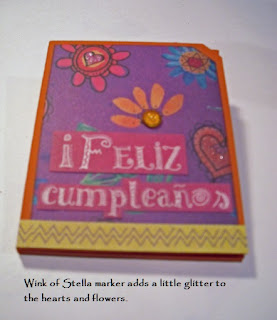
A Wink of Stella glitter brush and a Dew Drop decorate the front of the little "birthday card" made out of the glass slide holder.

More of the confetti pattern that is on the wooden legs is inside each of the squares that were mean to hold glass slides. Candy, a heart and a flower were cut out of other SABOR papers and glued in the openings.

The complete project. I didn't glue down the little people so that they can be repositioned depending on which side you want facing forward if it is used on a shelf.


Close-ups of each side:


SABOR Papel
3" Wooden Block
Ephemera Treasures pack
Assorted Game Pieces pack
Sabor AMOR cut-outs
Eco Board double glass slide holder
Tacky Glue
Crystal Lacquer
Stickles glitter glue
Wink of Stella glitter brush
Glue stick
YOU KNOCKED IT OUT OF THE PARK! Wonderful project with such a happy theme. Thanks for sharing it.
ReplyDeleteThis comment has been removed by the author.
ReplyDelete#alteredpagesSabor
ReplyDeletethese are delightful! xo
ReplyDelete