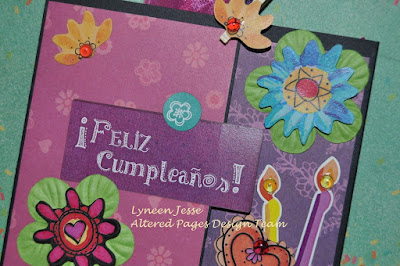
If you are like me there are plenty of times you remember someone's birthday at the last minute... too late for a trip to the store... but wait... SABOR Papers and Sabor Cutouts make it easy to make a birthday greeting in just a few minutes!!!
Supplies:
Black cardstock
SABOR - Ole Sentimientos
SABOR - Ole Picado
SABOR - Ramitos
SABOR - Ole Cutouts
Bazzil-Flower
Tacky Glue
Dew Drops
Glue Stick
Foam Dimensional Adhesives
Cut Black cardstock 11 x 4 1/2 inches, and score at 3 inches and 8 inches, fold towards the center for a "gate fold". When the card is folded it will measure 5 x 4 1/2.
Cut papers slightly smaller than 3 x4 inches for the front, adhere with Glue Stick. Add the cut out "Feliz Cumpleanos" (Happy Birthday).
On the front of the card add green Bazzil-Flowers use Foam Dimensional Adhesive to pop SABOR - Ole Cutouts in the center, attach to the card with Tacky Glue. With Glue Stick add other cutouts to the front as desired.
Cut papers slightly smaller than 3 x4 inches for the inside flaps, adhere with Glue Stick. Staple ribbon to tags from SABOR - Ole Cutouts "Te deseo lindo dia" (I wish you a beautiful day) and "Pide un Deseo" (Make a Wish). Attach with Foam Dimensional Adhesive.
Center inside add a flower like the ones on the front. With Glue Stick add other cutouts as desired, then with Foam Dimensional Adhesive add the piñata from the cutouts.
On the front add a few Dew Drops with Tacky Glue. Finally glue a flower cutout to a small clothes pin.... this will hold the card closed.
I love using Tacky Glue on these quick projects as it dries quickly if you do not apply too much. Glue Stick and Foam Dimensional Adhesives don't have a drying time!!!
Have a great day and come back tomorrow for another project from the design team!
Make sure to post to your Facebook page; #alteredpagesSabor for our giveaway drawings. Make a comment and have fun!
Supplies:
Black cardstock
SABOR - Ole Sentimientos
SABOR - Ole Picado
SABOR - Ramitos
SABOR - Ole Cutouts
Bazzil-Flower
Tacky Glue
Dew Drops
Glue Stick
Foam Dimensional Adhesives
Cut Black cardstock 11 x 4 1/2 inches, and score at 3 inches and 8 inches, fold towards the center for a "gate fold". When the card is folded it will measure 5 x 4 1/2.
Cut papers slightly smaller than 3 x4 inches for the front, adhere with Glue Stick. Add the cut out "Feliz Cumpleanos" (Happy Birthday).
On the front of the card add green Bazzil-Flowers use Foam Dimensional Adhesive to pop SABOR - Ole Cutouts in the center, attach to the card with Tacky Glue. With Glue Stick add other cutouts to the front as desired.
Cut papers slightly smaller than 3 x4 inches for the inside flaps, adhere with Glue Stick. Staple ribbon to tags from SABOR - Ole Cutouts "Te deseo lindo dia" (I wish you a beautiful day) and "Pide un Deseo" (Make a Wish). Attach with Foam Dimensional Adhesive.
Center inside add a flower like the ones on the front. With Glue Stick add other cutouts as desired, then with Foam Dimensional Adhesive add the piñata from the cutouts.
On the front add a few Dew Drops with Tacky Glue. Finally glue a flower cutout to a small clothes pin.... this will hold the card closed.
I love using Tacky Glue on these quick projects as it dries quickly if you do not apply too much. Glue Stick and Foam Dimensional Adhesives don't have a drying time!!!
THERE YOU ARE A QUICK CARD!!!
Have a great day and come back tomorrow for another project from the design team!
Make sure to post to your Facebook page; #alteredpagesSabor for our giveaway drawings. Make a comment and have fun!


Such a bright fun card! With or without the Spanish language notes, it is a perfect card!
ReplyDeleteLovely card! xo
ReplyDeleteOh! What fun! Easy too!! Cute. Cute!!
ReplyDeleteOh! What fun! Easy too!! Cute. Cute!!
ReplyDelete