Welcome to Sunday Day 6
of the
Smeared and Smudged
31 Days of Halloween Blog Hop!
AlteredPages.com is participating in a month-long blog hop with some amazing bloggers and we don't want you to miss any of their wonderful creations. Be sure to check out their art by following along using the list to the right!

Supplies:
Altered Pages Gothic Halloween Stamp Collection
Bazzil Halloween Paper Pack from Altered Pages
Tim Holtz Distress Markers
Clear Embossing Powder
Card Base
Stickles - Purple & Red
Webbed Ribbon

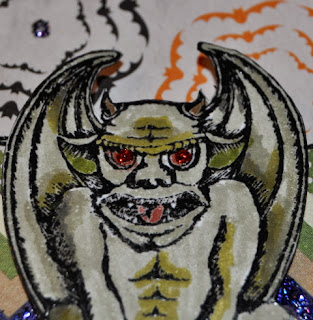
Layer papers and ribbon on base cardstock, attach to card. Stamp and heat emboss gargoyle and the word "Gargoyle". Color with Tim Holtz Distress Markers. Attach to card, use foam dots for gargoyle.

Thanks for stopping by, your next stop will be Leslierayhe's blog, and you can see all the wonderfully talented artists participating in this fabulously fun hop by following the links on the sidebar.
of the
Smeared and Smudged
31 Days of Halloween Blog Hop!
AlteredPages.com is participating in a month-long blog hop with some amazing bloggers and we don't want you to miss any of their wonderful creations. Be sure to check out their art by following along using the list to the right!
There are prizes to win, be sure to check out all the rules HERE and information. There is a daily scavenger hunt, you must go HERE to find the clue/s for the item/s you are looking for in the scavenger hunt. To find the previous day winners go HERE. Have fun and Good Luck!
Today we have a stamped Gargoyle card by design team member Lyneen!

Supplies:
Altered Pages Gothic Halloween Stamp Collection
Bazzil Halloween Paper Pack from Altered Pages
Tim Holtz Distress Markers
Clear Embossing Powder
Card Base
Stickles - Purple & Red
Webbed Ribbon

Layer papers and ribbon on base cardstock, attach to card. Stamp and heat emboss gargoyle and the word "Gargoyle". Color with Tim Holtz Distress Markers. Attach to card, use foam dots for gargoyle.

Thanks for stopping by, your next stop will be Leslierayhe's blog, and you can see all the wonderfully talented artists participating in this fabulously fun hop by following the links on the sidebar.
REMEMEBER
31 Days BLOG HOP Participants
there is a
31 DAYS COUPON CODE at our STORE.
Use the code to purchase anything up to $50.00 and you receive 20% off your order
OR
if you spend $50.01 to $100.00 you get free shipping
(Domestic only, We remove shipping cost when your order is processed)
SHHHHH - THE CODE IS.....
grim
(valid until October 31, 2013)
HAPPY HUNTING!


Love this Gargoyle! Such a demon with the red eyes that have a hint of sparkle. Nice how you embossed stamped image and give a nice sheen. Awesome background and love the added sparkle to the center of the shapes.
ReplyDeleteVery cool gargoyle He has relatives living in my home year round.
ReplyDeleteThank you for a great discount!
Spooky gargoyle and great papers. Love the sparkle. xxD
ReplyDeleteI JUST LOVE THIS STAMP!!!!
ReplyDeleteLOVE the gargoyle!!
ReplyDeleteGreat project!! I too love the gargoyle!
ReplyDeleteLove the gargoyle..that paper is neat too!
ReplyDeleteOoooh freaky gargoyle!! love this project! mo x
ReplyDeleteAwesome gargoyle stamp that you have used with such great paper!
ReplyDeleteTotes wicked cool gargoyle project, love the layers!
ReplyDeleteLeft some love on your blog about this wonderful gargoyle! Love how you did the background!
ReplyDeleteLove this gargoyle. You colored him nicely. The gems are a great addition.
ReplyDeleteThis is a fantastic card. Love the gargoyle stamp...he is pretty frightening.
ReplyDeletewow great project! the coloring is great! he looks cold as stone ;) love his eyes too!!
ReplyDeleteCool card, love seeing what began as a pile of stuff turned into such a great project.
ReplyDeleteGreat card. That gargoyle stamp is one of my fav's from Altered Pages. I love how you made him come to life.
ReplyDelete